The Nikki Sivils, Scrapbooker Diva's are going to share with you today(Friday) and tomorrow(Saturday) projects that feature some great Elmer's and X-acto products. Just visit EACH of the Diva's projects on their blogs and leave a comment. All of the blog links for Fridays post are listed at the Nikki Sivils, Scrapbooker blog and at the end of my post. After you have visited all of the blogs, go back to Nikki's blog and let her know you completed the hop. You will have until June 12th at midnight CST to leave comments (this applies to Julie's post and her team also that will be posting on Saturday). Come back on this post for a chance to win the prize that I am giving out and then you will need to post on Julie's for a chance to win hers! We will announce both winners on the evening of June 13th.
Here are the great Elmer’s and X-acto projects that I was able to work with for my project.
I found a metal frame at the thrift shop and I knew that would be the foundation for my project. I cut a piece of patterned paper from the It’s Raining, It’s Pouring collection by Nikki Sivils, Scrapbooker to fit the front of the frame.The Elmer’s Fabric and Paper Glue was perfect for attaching that cut paper to the frame front.
I wanted to accent the frame with some 3-D flowers and I knew the Elmer’s Foam Board would work perfectly for some of the layers. The large flower is a circle cut from the Elmer’s Foam Board and that was covered with a piece of patterned paper, a smaller cut flower and a circle middle.
Here is a close-up of my cut flower layers. I cut a circle from the red patterned paper and then made cuts into the circle to form petals. Next I folded each petal down the middle, with the fold backwards. The circle middles to the flowers are more circles cut from the Elmer’s Foam Board and these are also covered with patterned paper circles. I used the X-acto Craft knife to cut the Elmer’s Foam Board and I used the Elmer’s Fabric and Craft Glue to attach the paper pieces to the Foam Board pieces.
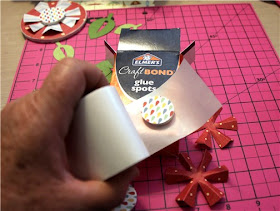
The layers of the flowers were put together with the Elmer’s Glue Spots.
I used my Cricut Expressions machine to create my design in the frame. The frame with the word “Welcome” cut in the middle of it was cut from the Home Accents cartridge. I cut it at 3 ¾” with the yellow cardstock. The letters are cut out and so I backed it with a strip of red cardstock. The leaves are also cut with the Cricut Expressions. I used the DoodleCharms cartridge and cut the leaves 1 ½” to 2 1/2” so I had different sizes.
I wanted to show you a close-up of the flowers and leaves, especially so you can see the different dimensions with the Elmer’s Foam Board parts. Plus, that wonderful, pink, Self-Healing cutting mat was great to work on!!!
Plus a close-up of the cut “Welcome” label
Here is Friday's blog list - be sure to stop at each blog
Jennifer Yates
Sarah Eclavea
Katrina Hunt - her post will be up on Saturday along with the other Nikki Sivils team
Thanks for visiting, Linda (lbpost)


What a darling project Linda!! Thanks for sharing!! Smiles
ReplyDeleteGreat job!! This is such a cute project, I may need to steal your idea and make something like this for my house!! It's very cute!
ReplyDeleteLinda,
ReplyDeleteIt's a beautiful project!
Hugs Lea
gosh how pretty is that. wow!!! i love it.
ReplyDeleteAwesome project Linda! Love this!
ReplyDeleteJust GORGEOUS!! I loveeeeeeeeeeee the flowers!! So AWESOME! :):):):):):):):):):):):):):)
ReplyDeleteAbsolutely adorable frame technique! Love these papers....thanks for the inspiration!
ReplyDeleteWonderful project! Thanks for the instructions for the flowers!
ReplyDeleteWhat an adorable project!!!!!
ReplyDeleteFantastic! Great project! Thanks for the tutorial and for the chance to win! :)
ReplyDeleteLove your project, Linda a great job as always....WTG
ReplyDeleteThanks for a great project
ReplyDeleteSuper cute spring-y colors!!
ReplyDeleteTFS!! Take Care!!
Jennie @ http://earthyscrap.blogspot.com/
Very lovely frame!! Love the flowers! :-) I'm a new follower!
ReplyDeleteTerrific project today and I thank you for the flower how-to.
ReplyDeletesmilesmoore2 atverizon dotnet
Love this! Those tools look so fun!
ReplyDeleteFabulous flowers! I love your project!
ReplyDelete