Wednesday, June 30, 2010

Kitty Cats and the Bee

I wanted to share this layout with you today. At Nikki Sivils, the team had a challenge that was pretty fun. The first gal on the list created a layout and then each of us in the line created from inspiration from the person ahead of us. I was third in line so I pulled from the first layout and the second one. You can see all of them here.
Our cat can look so regal so taking photos of her is fun. The main piece of paper on my layout is from the Bella Blue and Oscar Too collection, so fitting for your pet. I love those little lips in the Hot Lips patterned paper from the Will He B the 1 collection and I thought that fit pretty nicely to my girly girl layout. You can see that I pleated my strip of that paper.
***
And a couple more photos.
I was walking up to a garden to see what was in bloom on this day and this flower was the first to greet me, looking rather regal itself.
And, while I am not a fan of bees, this one was so neat looking as it was hanging around these flowers which I think are actually wildflowers.
AND...I need to share a little movie review. I took our granddaughter to see Marmaduke today and it was such a fun movie. Funny and just plain cute! A good summer activity.
Thanks for visiting, Linda (lbpost)

Monday, June 28, 2010

Water fun and Stamping

I put these two themes together on this layout, my grandson playing in the water spouts and some really neat stamps!
The stamps are from the Banner set by Pink Persimmon. In fact, you will find a little tutorial on the Pink Persimmon blog on using these cute banners as my accent. The cardstock is Core Impressions by Core'dinations. It comes with that great embossed design in it already. I slightly sanded it to expose the design. We found this fun water spout fountain at one of our malls and of course, watching my grandson interact with the jumping spouts was too much fun.
Here is a close-up of the stamped banners. What I love about this stamp set is that the triangular banners come in different designs and they look so good stamped in colors. This means that you can custom make your banner to match whatever colors you are working with. The banner set comes with the stitched banner too so the black zig zag lines around each banner are really stamps, stamped with black ink. I used a wave punched border for an accent.
This circle is also a stamp by Pink Persimmon. It makes a great journaling piece but here it worked to hold my title letters.
***
Gotta share some photos...
Some friends horse just had a new baby, can it be any cuter???
And, we captured this wonderful sunset as we were driving into Medford, OR a couple weeks ago. The colors are hard to believe.
Thanks for visiting, Linda (lbpost)

SPLASH layout
Materials:
Cardstock – Core Impressions/Core’dinations
Stamps – Pink Persimmon
Border punch – Fiskars
Memento and Versafine Stamp pads
Sandpaper

Saturday, June 26, 2010

It is Summer!

My favorite thing about summer is the longer hours of daylight - I just have a whole new life with what seems like more hours in my day. SO...one of my cards I want to share with you in this post has to do with summer and one with birthdays plus a few photos from a little trip we just took.
This first card uses the Unscripted Sketch #61 for this week and my favorite cardstocks, the Core Impressions collection from Core'dinations. AND...I just might have a little secret that I can share with you very soon and it just might have to do with Unscripted Sketches!!! Stay tuned!
I love to use buttons on a card but I really don't like the holes without thread in them and I really don't like sewing the thread in the holes so one solution is to add self adhesive rhinestones on to the buttons. I love the look and that little bit of added bling.
Here is my SUMMER related card. The little photo is one I took on a trip. I always want to stop at Lighthouses when we are close to one and I always take lots of pics.
The sun is created by tearing the Vintage cardstock by Core'dinations and the background is a piece of Black Magic that I embossed with a Cuttlebug embossing folder. The the CORE that is exposed when you tear this cardstock and LOVE the black with the exposed blue core when this is sanded.
***
And for the photos
I believe this is just a weed but I just had to take some pics of it. We were driving along the coast in Northern California and found these. They are completely weightless and look like rattlesnack rattles.
I was driving around Jacksonville, OR a couple weeks ago and these red poppies were everywhere. I had to stop and take photos of them in this one yard that was all overgrown with flowers.
This is a close-up of the buds before the flowers open, LOVE how unique they are.
Thanks for visiting, Linda (lbpost)

BIRTHDAY WISHES card
Materials list:
Cardstock – Cosmo Cricket Core Impressions/Core’dinations
Patterned paper – October Afternoon
Sandpaper
Corner rounder punch - Fiskars
Sentiment sticker - SRM
Buttons – PaperTrey, Inc
Rhinestones – Queen & Co.
Flower punch – Papershapers
Fluid chalk stamp pads - Clearsnap

VACATION - GETAWAY card
Materials list:
Cardstock – Black Magic, Vintage and Core Essentials/Core’dinations
Sandpaper
My Own photo
Fiskars wave border punch
Rub-on words - Making Memories
Cuttlebug embossing folder

Another Flower Soft day!

Yeah, it is Saturday again and that means my day to post at the Flower Soft blog.
Here is a little sneaky peeky at one of the cards I posted. I wanted to show that adding just a bit of Flower Soft to stamped images really can add that WOW factor!
Go to the Flower Soft blog now to check it out! You know I will appreciate it if you do.
Thanks for visiting, Linda (lbpost)

Wednesday, June 23, 2010

Flower Soft Topper Blog Hop

If you want one way to find all kinds of great inspiration for using Flower Soft and the Toppers that they offer, then a Blog Hop is for you! AND, the good news is the Design Team for Flower Soft is hosting one today. Plus, to add to that goodness, there will be a give away when you comment at each blog. You might have come here from the Flower Soft blog, where this hop is starting.
I picked this cute, fishing topper from the Moments in Time, Boys Hobbies collection for my card. The Toppers come with more then one print in each package and more then one copy of each design. They are competely colored already, ready to use right out of the package. This makes them great for multiple cards.
I have mentioned this before, but for the best results with the Flower Soft, you need to use the Tacky Glue that they sell and you need to be generous with the amount of glue you use. I took a photo of my glue before adding the Flower Soft so you can see what "generous" means. When you buy the glue from Flower Soft, it comes in a nice, small tipped bottle. This glue is really Aleene's Tacky Glue so you can refill you bottle with that.
I used two different greens to make my grass more interesting. First of all, I sprinkled on a small amount of the Christmas Green Flower Soft. This is the original type of Flower Soft and the little chunks are larger. Next I filled that in with Sage Ultra Fine Flower Soft.
The sun image is cut from a piece of Fancy Pants patterned paper and then accented with Citrus Crush Ultra Fine Flower Soft.
From here, hop on over to Jeanne's blog to see what she has created to share with you. You have until the 29th at 6:00 PM to leave your comments for the drawing.
(Be sure to watch the Flower Soft TV episodes too. You can sign up for updates on those by becoming a follower. At this link, click the green button. New episodes every Friday.)
Thanks for visiting, Linda (lbpost)

RELAX card
Materials list:
Fishing Topper – Flower Soft
Christmas Green Flower Soft
Sage and Citrus Crush Ultra Fine Flower Soft
Tacky Glue – Flower Soft and Aleene’s®
Cardstock – Core Expressions/Core’dinations
Patterned paper – Generation/Little Yellow Bicycle and Rusted Sun: Sunrise/Fancy Pants Designs

Sandpaper
Corner rounder punch - PaperShapers
Zig Zag scissors
Letter stickers – K&Co.
Circle template - Coluzzle

Saturday, June 19, 2010

Sketch day

It is time to show you my Card Positioning Systems sketch card and I found another sketch this week I just had to use so gotta share that too.
I just got my hands on some of these new BasicGrey papers and stickers, so they are the main part of my card for CPS sketch #172. I just love the basic designs of this collection and I loved putting the red with the blacks/whites.
The red, embossed label is a Spellbinders Nestabilities and I cut it so it looks like arrows. The embossed label is perfect with Core'dinations cardstock since you can sand it and expose the embossed areas.
For this card, I found that Cosmo Cricket and SRM stickers was having a blog hop and a sketch challenge so I pulled out some of both to give it a try. I paired the Cosmo Cricket patterns with my Cosmo Cricket Core Impressions Core'dinations cardstock - perfect match!
This photo shows a nice close-up of the embossed pattern in the cardstock. I cut out one of the shapes in the paper and added it over the matching shapes with foam tape for some added interest and to match that the sketch has three elements on the top of the card.
Here you can see how nicely the SRM sticker worked for my sentiment and I added some Cosmo Cricket alphabet stickers to it.
***
Some photos to share:
We were driving around Weed, CA - at the Oregon border - and we saw these rainbows, the most intense colors we had ever seen in a rainbow. I loved how this one appeared to be going right into the ground.
Notice this one is a double rainbow although I didn't catch the second one well. It also points right into the snow topped mountain.
I love to be on the lookout for fun road signs and thought this one was fun.
Thanks for visiting, Linda (lbpost)


SKETCH 172 – YOU’RE THE BEST card
Materials:
Cardstock – Core Essentials/Core’dinations
Patterned paper – BasicGrey and My Mind’s Eye
Label shape sticker and Rub-on sentiment - BasicGrey
Corner rounder punch – Fiskars
Label – Spellbinders/Nestabilities
Sandpaper


YOU’RE SPECIAL FRIEND card
Materials list:

Cardstock – Cosmo Cricket Core Impressions/Core’dinations
Patterned paper – Cosmo Cricket
Sentiment sticker - SRM
Sandpaper
Self adhesive rhinestones – Queen & Co.
Foam tape – 3M
Alphabet stickers – Cosmo Cricket

Sneak peek of my Flower Soft day

It is Saturday and so it, again, is my day to post over at the Flower Soft blog. I wanted to give you a little peek at my project for today.
This is a side view so you can see the dimension that the Flower Soft adds to a project. Of course, there are a few pics in my post at Flower Soft and I also gave some details of the finished project.
Thanks for visiting here and there, Linda (lbpost)

DO I SMELL CAKE? card
Materials list:
Flower Soft – Polar White, Sweet Pea and Sunshine Yellow
Tacky Glue – Flower Soft/Aleene’s
Cardstock – Core Expressions/Core’dinations
Patterned paper – Chic Bebe Girl: Notes Paper/Teresa Collins Designs
Stamps – The Cat’s Pajamas
Copic markers

Sandpaper
Self adhesive rhinestones – Queen & Co.
Foam tape – 3M
Black Versafine stamp pad
Clear embossing powder – Stampendous
Glitter 3-D Fashion Paint - Tulip

Friday, June 18, 2010

Nikki Sivils Day and SNOW!!!

It is my day to post at Nikki Sivils Scrapbooker. I am going to share my two cards here but you need to hop on over to the Nikki Sivils blog to see the close-ups, read the details and see the materials list. Plus, if you would leave a comment there, I would look real good - THANKS!
For the first card, I wanted to play along with the Moxie Fab challenge to use a bicycle on a card so I printed out this photo I just took on a little trip we were on. I loved the little scene as it sat against this fence outside this cute house.
I used papers from the Will He B the 1 and the Ellie's Day Out collections. Like I mentioned, I have close-ups at Nikki Sivils.
This card uses papers from the Will He B the 1 collection. This piece of paper comes with the patterned strips on it.
***
SNOW DAY - JUNE 10, 2010!!!!
You read that right - it snowed last week as we were driving up Mt. Ashland to get a look at how the mountain looked, looking for wildflowers!
As we were driving up, higher and higher, it started raining and that turned to actual snow flakes coming down as we neared the top. This made me SOOOOOO happy! As a Southern California, I could actually get some snow pics.
The top of the mountain was covered with fog and it was so cold! I couldn't keep the lens on the camera dry for even a second as the snowflakes flew at me.


The weather would change just about every other minute, here the blue sky was trying to peek through as the steam was pouring off of the road.
Then look at this sight we found as the rain stopped and the blue skies peeked through.
Thanks for visiting, Linda (lbpost)

Tuesday, June 15, 2010

Dirt and Boys

It seems that Dirt and Boys just go together and our youngest grandson is no exception!
I was watching him, he was around a corner and very quiet!! He emerged showing off these hands that were completely covered with wet sand! He was pretty proud, actually. I happened to have the camera in my hand and quickly started clicking photos.
This background cardstock is one of my absolute favs, woodgrain embossed cardstock by Core'dinations. This cream color is just plain wonderful.
Even though I usually think that scallops are a little more "girly" in their look, I still thought these layers of orange scallops worked here and complimented the Cosmo Cricket papers.
***
And a couple photos.
This has been the season for playing with bubbles for us and this is one of the amazing ones that was fun to capture.
This little guy has been in our backyard lately, he and several of his friends. He is really very tiny and they hop from branch to branch. Pretty fun to watch and hear.
Thanks for visiting, Linda (lbpost)

Saturday, June 12, 2010

CPS #171 - Congratulations

It is another week with another sketch at Card Positioning Systems. I love working with sketches so it always makes me happy to have another sketch to create with.
The sketch had three smaller diamond shapes on it but I wanted to give the banner stamps by Pink Persimmon a try so my diamonds are a little bigger. That is just fine because a sketch is supposed to inspire you to a design, not have you necessarily copy it exactly.
I used one of the banners from the larger banner set. I just love the designs that are in each banner. You can see in the above photo that I stamped it once with black ink. Because the stamps are clear and I put it on an acyrlic block that is clear, I can see exactly where I wanted to stamp that banner stamp again. I just stamped the banner in the opposite direction, giving me a neat, diamond shape. I did that three times and then just cut them out.
The little rosette circle is part of the Big Banner set. I stamped it with black ink on white cardstock and then gave it a little antiquing with a brown stamp pad. I cut a strip from an old magazine and pleated that and sewed it down the middle of my little diamond design. This was finished off with some self adhesive pearls by Queen & Co.
For more ideas on using the banner stamps, visit the Pink Persimmon blog where I did a little tutorial on using them on a layout.
***
And for a few photos. I visited that garden near us that I have talked about before. I just love standing at the Koi pond. Here are some photos of those guys.

While I was waiting for another fish to be in the right place to photograph, I noticed how neat the clouds in the sky looked reflected in the water.
Do you see the swirl in the water from him swishing his tail?
Thanks for visiting, Linda (lbpost)
Materials:
Cardstock - Core'dinations
Patterned paper - Baby Safari/Little Yellow Bicycle
Stamps - Banner set (large), Big Banners, Vintage Greetings/Pink Persimmon
Black Versafine stamp pad
Self Adhesive pearls - Queen & Co.
Pages from vintage magazine
Circle punch - PaperShapers
Tonic Paper Distresser
Machine sewing

Wednesday, June 9, 2010

Summer Time

You need to know this! Nikki Sivils, Scrapbooker just revealed a sneak peek of some of the goodness she has coming soon, you NEED to check it out, here.

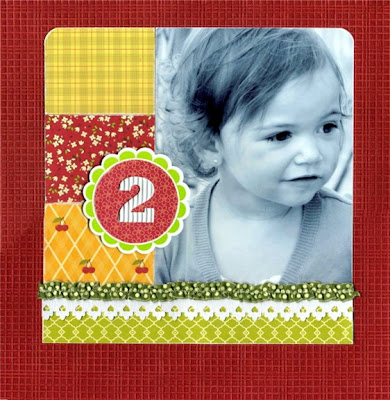
These papers by Jillibean Soup just look like summer so I thought that made a good title for this post.
The red, background cardstock is a piece of Core Impressions from Core'dinations. All of that great embossed design is already in the paper and you can sand it if you want or leave it as is. I love the way these particular prints by Jillibean Soup combine together. This is my niece's little girl.
I used one of the Sprouts to make my little accent piece to hold the number 2.
I ruffled the ribbon and then sewed a line of machine sewing down the middle of that and the white piece is using one of my border punches.
Since we are talking about Summer, I wanted to share these ATC cards that I created some time ago. Once you get used the small work area, these things can be fun. I used photos that I had taken for the main accent on most of them.
***
And, a couple photos to share.

Can you see who is getting a ride on that truck? LOVE to watch little boys play. We can't wait for the new movie to come out!!!

Thanks for visiting, Linda (lbpost)