
Todays post is about some really fun stamps. Fun in design and fun to use.

The first card I want to share is this cutie created with My Stamp Box stamps. Core'dinations cardstock and My Stamp Box did an exchange and this is one of the cards I put together with these stamps. I LOVE this set of stamps, how does it get better then patterned clouds! Be sure to check out both of those blogs, Core'dinations and My Stamp Box, for more ideas, both teams created cute stuff and there are prizes to be had by leaving comments on both blogs.

For this card I did an exercise with masking.
If you don't know what masking is, it is a technique that allows you to stamp more then one image and have one look like it is "behind" the other or one "on top" of the other, whichever way you look at it.
1. I stamped the sun first.
2. Then I stamped the sun on a piece of copier paper (you need a thin paper for a mask). I cut that extra sun out. Now that cut out sun is placed over my original sun and one of the clouds was stamped, inking it with black ink. Where the sun mask is, the cloud image will not stamp and when the sun mask is then removed, you will see the sun looking like it is "on top" of that cloud.
3. I then made a mask of the first cloud, I placed the sun mask and the cloud mask over the images I had stamped and I stamped the second cloud. Now my sun and the first cloud look like they are "on top" of the second cloud.
4. I kept those two masks in place and sprayed my white cardstock with some Glimmer Mist spray, first a blue Chalkboard spray and then a blue Glimmer Mist spray to create my "sky" behind the sun and clouds. This kept the spray off of the sun and clouds.
The sun is accented with a little bit of Glitter 3-D Fashion Paint for just the right amount of glitter.
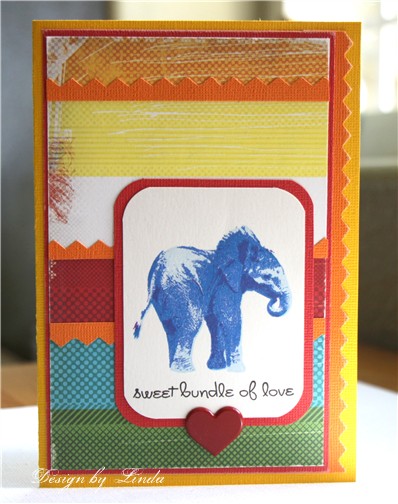
Next I want to share my Card Positioning Systems card for this week. The sponsor is Kitchen Sink Stamps. If you are not familiar with that company, it is known for it's 3 or 4 step stamping process. I just don't even know how she does it, but by stamping the layers, you keep adding details that are pretty hard to believe are stamps.

This is one of her brand new stamp sets. This little elephant is just too adorable. I chose to stamp it in shades of blue so that it would fit for a baby card. The set comes with a number of adorable little sentiments to go with it. I just love the font she uses.
One thing about using these stamps is determining what colors to use for the layers. It works best to start with a very light shade and then each additional layer should be darker and darker. For my last layer on this little guy, I used a purple that really helped define the cute details. I listed the exact shades I used in my materials list.
Thanks for visiting, Linda (lbpost)
RAINY DAY? card
Materials list:
Cardstock – Vintage and Core Essentials/Core’dinations
Curious Iridescent Cryogen White/CutCardStock.com
Clouds, sun and sentiments stamps – My Stamp Box
Black Versafine stamp pad
Clear embossing powder
Tattered Angels – Glimmer Mist and Chalkboard
Sandpaper
Self adhesive rhinestones – Queen & Co.
Copic markers
Glitter 3-D Fashion Paint – Tulip
SKETCH 185 – SWEET BUNDLE OF LOVE card
Materials:
Cardstock – Core Expressions/Core’dinations
Elephant and sentiment stamps – Courtesy of Kitchen Sink Stamps
Patterned paper – Cosmo Cricket
Versafine black stamp pad
Memento stamp pads - 1. Summer Sky, 2. Bahama Blue 3. Danube Blue 4. Grape Jelly
Heart brad - Recollections
Corner punch – Martha Stewart
Sandpaper
Fun stamps = fun cards! Love these Linda!
ReplyDelete(-: Heidi
These are fantastic! Beautiful cards!
ReplyDeleteWonderful cards - FAB use of the Kitchen Sink Stamps Lil' Elephant!
ReplyDeleteoh linda that is BEAUTIFUL!
ReplyDeletesuch fun and fabulous cards and stamps!
ReplyDeleteWOw love these cards, that elephant one looks so african, with its bright colors, and I love what you did with your cloud stamp set!!
ReplyDelete