Sunday, December 26, 2010

Snow at your house?

We won't be getting any snow here at our house but I can still make snow-themed cards.

This card is my Unscripted Sketches card for this week.  I love these Echo Park Paper Co. papers.
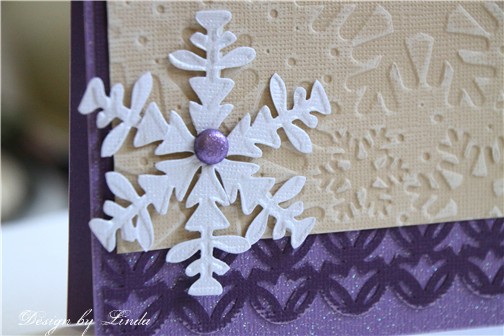
I embossed the white cardstock for the top portion of my card and the big swirl is accented with Tulips Glitter 3-D Fashion Paint. I just love what this stuff does to add some interest to a card.
This is my Card Positioning Systems sketch card for this week. We were to pick out a sketch from the past for our last card of the year. 
I used a JustRite stamp for my circle accent, a really cute snowman.
And for a few photos...
Do these look YUM? Some Christmas cupcakes from one of our cupcake stores.
One little preview of our Christmas day.  This was HIGH on his Christmas list! He is in awe of semi trucks these days.  Isn't it the best to actually get what you asked for?
This is what our yard looks like right now, no snow but LOTS of leaves!

Thanks for visiting, Linda (lbpost)

SKETCH 87 – SNOW-SNOW card
Materials list:
Cardstock – Core Essentials/Core’dinations
Patterned Paper – WinterTime/Echo Park Paper Co.
Cuttlebug embossing folder
Glitter 3-D Fashion Paint/Tulip
Self adhesive pearls – Queen & Co.
Sandpaper

SKETCH (Pick One) – SLEDDING SNOWMAN card

Materials:
Cardstock – Core Essentials and Vintage/Core’dinations
Copic paper
Patterned paper – Martha Stewart
Stamps – JustRite stamps
Memento

Clear embossing powder – Stampendous
Copic Markers
Circle and scallop circle punches - PaperShapers
Rhinestone swirls – Prima

Tuesday, December 21, 2010

Almost time for Santa

If you have a minute, will you vote for my card at Scrapbooks, Etc.? You can vote everyday this week, THANKS!!!

And I have just enough time to share a couple more projects with you. 
First off, my Card Postioning Systems card for this week.  I turned the sketch on it's side and used a brand new stamp set I have from Pink Persimmon.  I cut a little bit off of a piece of the "loopy" shaped paper for an edge. 
 I started out stamping the tree image on white cardstock with white ink and I embossed that with white embossing powder.  Now I could apply various color mediums over this stamped image and the image will act as a resist.  I rubbed it with stamp pads first.  Next I created a mask for the tree image itself and sprayed the paper with Glimmer Mist.  The reason I did this was that I wanted the area where the words were to be a lighter blue and the area around that to be a little bit darker blue.  The masking protected where the white words are and since my mask is in a tree shape, I helped further the thought that the words were in a tree shape. 
Another project I wanted to share is this very simple little accordian fold album.  We did a little photo shoot with our youngest grandson and of course, every photo was adorable!!
The album base was purchased, 4"x6" photos fit on each piece of the folds perfectly.  What is nice about that is that all that was then required was a very simple amount of additional accents. 
 I just added rub-ons and sticker letters here and there.
What a fun way to remember our Santa Baby. 

One more Disneyland Castle photo with the Christmas fireworks show.

Thanks for visiting, Linda (lbpost)
And may you all have an amazing holiday with family and friends.

Sunday, December 19, 2010

Holiday Time

Holiday time means so many things and one of those things is Christmas cards and Christmas presents.  I so love creating them so I, of course, want to share them with you.

For this first project, I used a great download from Flower Soft.  It has little round designs, one for each of the 12 days of Christmas but it is called the 12 Bears of Christmas.  Each one comes with a matching round design that has the words for each day on it.  These are so easy to print out and then I just punched mine out.  I decided to create one card with one of them but I could see making ornaments and having each one 2 sided or creating a really cute banner. 
I added some Sunshine Yellow Flower Soft to the little bears skirt, shoes and hair bow plus around the other circle as an accent. Add the Flower Soft with a generous layer of Aleene's Tacky Glue.  It is so fun what a little bit of Flower Soft adds to an image. 
For my next project, I used one piece of scallop circle patterned paper from Nikki Sivils, Scrapbooker's Christmas collection, Holly-Jolly.  I cut the one scallop circle in half and then folded each of these two pieces in thirds and glued the bottom edge.  How cute are these for holding a gift of candy or even some money or a small gift.
This cute nutcracker is a die cut that is cut out of one of the pieces of patterned paper. 
This set of trees is cut from the same piece of paper. 
And, get ready for this!!!
Our youngest grandson is irresistible all of the time but I don't know if it can get better then this with his stylin' sunglasses and his new hat. 
His Aunt Mandi captured this look!
Thanks for visiting, Linda (lbpost)

Friday, December 17, 2010

Do you Deboss?

Core'dinations blog is hosting a 12 days of techniques using Core'dinations cardstock.  My day was to use the technique of DEBOSSING.   (There is a give away each day too, so be sure to visit to see the great projects and to enter to win)
Embossing is so popular right now, especially with the embossing folders that several different companies are selling. Debossing is just the reverse image of that embossing. SO, embossing is indenting an image into the back of a piece of paper, debossing would be making the indent on the top side of the paper.  Because you would want to do this on the front side of a piece of Core'dinations cardstock so you can sand you design, I simply embossed my piece with my paper in the Sizzix embossing folder, backwards.   
The snowflakes are then "indented" into the paper, it is a reverse design.  This way I could still sand my Core'dinations cardstock on the front to further expose that design.   

I did the same with the snowflake.  This is a 2-step die and embossing folder set.  I just embossed it backwards.  That bottom edge is a border punch and I used new Core Couture glitter cardstock for the card base. 
And for a couple photos...
We visited a Historic House in Camarillo for a Christmas party this last week.  Here, Aunt Mandi holding our youngest grandson as they enjoyed the decorations. 
Aunt Mandi and her husband were actually married at this house so it was really special to go see it decorated for Christmas and being able to get a little tour of the amazing rooms and their decorations. 

Thanks for visiting, Linda (lbpost)

Wednesday, December 15, 2010

New Babies

"For unto you is born this day,
in the city of David,
a Saviour who is Christ the Lord." 

That's it, this is the story of God's plan towards mankind.  All of mankind.  Everybody loves a new baby, all soft and cuddly and smelling wonderful. 
The story of Christmas with this new baby coming is so much more then just oohing and aahing over a new little person. 
It is one part of the most amazing
plan for you and me. 
There is a song I love -
"I'm forever grateful to you
I'm forever grateful for the Cross
I'm forever grateful to you
that you came to seek and save the lost."
Christmas and this new baby is only one
piece of a plan that changed the world
and is the most important gift
we can ever receive. 
I love all of Christmas, the songs, the decorations, Santa and gifts.  We always remember the real reason behind Christmas being Jesus' birth too.  I love the feeling in the air and the goodwill towards others. 
It is exciting, enjoy all of it but remember God's entire plan too. 
Gotta share my Card Postioning Systems card for this week. 
I was at a stamp convention recently and found this great "verse" stamp by Printworks.  I knew I would want to use it as the main forcus of a card but it can also be a great background.
 
I did stamp it on white cardstock but then colored that with Distress stamp pads and punched the one edge with an EK Success border punch.
The snowflake stamp is by Inkadinkadoo.  I wanted a very simple accent so I stamped it with black and embossed that with clear embossing powder.  A simple, silver, glitter brad finishes that.

And for a couple photos...
We have a Christmas light boat parade during the holidays.  This was our first year to go and it was so beautiful. 
Thanks for visiting, Linda (lbost)

Monday, December 13, 2010

It's beginning to look alot like Christmas

Or, Christmas cards for that matter. 
I love to use photos on cards and Christmas is the perfect time to personalize your cards to friends with an adorable photo.  I used Nikki Sivils, Scrapbooker, Holly-Jolly Collection for my cards.

I cut the holly and berries from a paper that has die cuts on it.

The berries are accented with Tulips Glitter 3-D Fashion paint. I like that this has glitter in it but allows the colors underneath to show through.

This piece of paper with the little Nutcracker on it is from a mini pad of papers from the same collection. It was the perfect fit to just add the photo.
The hat is accented with Aleene's Paper Glaze.  This is easy to use and gives a great epoxy look.

And, a few more photos from our Disneyland trip.
We took the submarine ride.  You can tell he was glued to the little round window.
I loved this photo of one of the windows on the submarine.
The gift shops were full of the most adorable Christmas things to buy.
Loved these little Mickey-Santas. 
I am sure his favorite part of the entire park was the playground at Goofy's house. 
How cute are these little eyes peeking out of the pumpkin.
Another cool fireworks photo. 

Thanks for visiting, Linda (lbpost)

Saturday, December 11, 2010

Colors, sketches, glitter and Disney!

Yes, this post is about all of these things!!!  First off, how about colors?
I usually find it hard to resist playing along with the Colour Q challenge and this week it was impossible to NOT play. It is a fabulous combo for Christmas but it works for so many other occasions, I plan to use it again.
I started out wanting to include snowflakes with my colored, embossed circles but it was too much so this makes my card fit any category that is "happy". 
The card base is Gemstones cardstock by Core'dinations, just with the most perfect shine. I discovered that this paper is sold by the sheet at Joann craft store and so you can buy as many pieces as you need, YEAH!  My circles are punched and then all of them were embossed with a Cuttlebug embossing folder and slightly sanded.  The finishing touch is my GLITTER brads and that fits with the Moxie Fab challenge right now to use glitter on a project. 
Now, we go to the Unscripted sketch for this week that always posts on Saturday.  You can see that I turned the sketch for my card.
I just love these papers from this collection by My Minds' Eye.  I cut the pieces out of one of the patterned papers for accents.

I pulled out my new label stamp set by My Favorite Things and this set included a die to cut the label just right.  I stamped it with brown ink and slightly rubbed it with a Fluid Chalk stamp pad that matched my papers. 
GOTTA share some photos from our recent Disneyland trip!
He was having so much fun trying on hats, this one is a Chip and Dale hat.

There are so many reasons that visiting Disneyland during the Holidays is amazing and all of the cute hats and Mickey ears are one of them.
 Look at these too.
 Big sissy had to try this cutie on.
Another photo from the fireworks show - every minute of it was amazing. I wish I could see it over and over again.

Thanks for visiting, Linda (lbpost)

HAPPY - CIRCLES card

Designer: Linda Beeson
Materials list:
Cardstock – Core Essentials and Gemstones/Core’dinations
Cuttlebug embossing folder
Glitter brads – Recollections
Circle punch – PaperShapers
Rub-on sentiment – Making Memories
Corner rounder punch - Fiskars
Sandpaper

SKETCH 85 – SIMPLY WONDERFUL layout

Materials list:
Cardstock – Core Essentials/Core’dinations
Patterned Paper – My Mind’s Eye
Label and sentiment stamps – My Favorite Things
Die cut label – My Favorite Things
Black Versafine stamp pad
Fluid Chalk stamp pads – Clearsnap
Decorative brad – Recollections
Foam tape – 3M
Sandpaper