Showing posts with label Glimmer Mist. Show all posts

Saturday, September 3, 2011

Stickers and Stamps


 First off, I want to share my Unscripted sketch card with you.  Here is the sketch. 
 I really like the sketch this week.  It was simple and fun.  Part of the fun comes with the Little Yellow Bicycle supplies. 
 The fun flowers are stickers. I just love this particular collection of papers and stickers.
 My next card represents some "play time"! I love to experiment.  I placed a stencil down on plain white cardstock and sprayed this with the blue Chalkboard Glimmer Mist.  After I finished spraying, I realized that I had lots of spray on the entire stencil so I carefully picked it up and turned it over onto another piece of plain white cardstock.  All of that extra blue ink was now on my paper.  Next, with the stencil in place, I sprayed it with yellow so that they yellow Chalkboard Glimmer Mist colored the vine design in the stencil. I just loved the resulting combination.  I also colored white seam binding with the same yellow spray.
 The little butterflies are a stamp by Inkadinado.  I thought stamping them with the solid black was a good contrast.
And for a few photos...
 I am having a ball with my Hipstamatic camera app on my phone. I just stand and keep changing the lens and films!  We went to walk around our harbor the other day so I had to capture some photos of the boats.
 Here is another lens/film combo for a completely different look.
This photo is of some wind wheels. 
Thanks for visiting, Linda (lbpost)

SKETCH 122 – THANK YOU card

Materials list:
Cardstock – Core’dinations
Patterned papers and stickers – Little Yellow Bicycle
Rub-on sentiment – EAD Designs/Paper Smooches

YOU ARE MY REASON WHY card

Materials list:
Cardstock – Core’dinations
Border and corner punch – Martha Stewart
Ribbon – Really Reasonable Ribbon
Stencil – Layers of Color
Spray mist – Chalkboard/Glimmer Mist
Butterfly stamp – Inkadinkado
Stamp sentiment – Technique Tuesday
Self adhesive rhinestones – Queen & Co.
Black Versafine stamp pad
Clear embossing powder – Stampendous

Tuesday, December 21, 2010

Almost time for Santa

If you have a minute, will you vote for my card at Scrapbooks, Etc.? You can vote everyday this week, THANKS!!!

And I have just enough time to share a couple more projects with you. 
First off, my Card Postioning Systems card for this week.  I turned the sketch on it's side and used a brand new stamp set I have from Pink Persimmon.  I cut a little bit off of a piece of the "loopy" shaped paper for an edge. 
 I started out stamping the tree image on white cardstock with white ink and I embossed that with white embossing powder.  Now I could apply various color mediums over this stamped image and the image will act as a resist.  I rubbed it with stamp pads first.  Next I created a mask for the tree image itself and sprayed the paper with Glimmer Mist.  The reason I did this was that I wanted the area where the words were to be a lighter blue and the area around that to be a little bit darker blue.  The masking protected where the white words are and since my mask is in a tree shape, I helped further the thought that the words were in a tree shape. 
Another project I wanted to share is this very simple little accordian fold album.  We did a little photo shoot with our youngest grandson and of course, every photo was adorable!!
The album base was purchased, 4"x6" photos fit on each piece of the folds perfectly.  What is nice about that is that all that was then required was a very simple amount of additional accents. 
 I just added rub-ons and sticker letters here and there.
What a fun way to remember our Santa Baby. 

One more Disneyland Castle photo with the Christmas fireworks show.

Thanks for visiting, Linda (lbpost)
And may you all have an amazing holiday with family and friends.

Thursday, December 2, 2010

Paper and Snowflakes

I want to share a couple cards that have snowflakes on them but first of all, can I do a little paper review?
As far as cardstock is concerned I only use Core'dinations. I love the texture, the color choices and the amazing variety with the newer Core Impressions collections.  But, I have another fav for when I want to color in an image using Copic markers. 
I used to use Curious Iridescent Cryogen White, I liked the slight sparkle to the paper, it stamps and embosses wonderfully and the inks from the Copics blend pretty well.  One drawback is that the white is not a bright white and sometimes that is a problem. 
I decided to try the new Copic Blending X-Press It paper.  I found some at Simon Says Stamp, I liked that I could get a small amount to try.  I LOVE this paper.  First of all it is velvety smooth, you want to use it just for that reason.  Second it is an amazing bright white.  You can stamp and emboss on it perfectly and the Copic inks just glide over it.  They seem to melt together.  I have been using it with other supplies too like spray mists and that works great too. 
For my two cards that I want to share today, I used this Copic paper. 
First off is my Card Postioning Systems card.  The sponsor this week is The Stamps of Life.  The set I used just might be my favorite Holiday stamp set because it is so easy to use and so verstile.  Seven of the designers used this set at CPS this week and every card is so different. 
 
I love the big sentiment that fits a card so nicely and I just slightly colored in some of the letters.  The papers are by Echo Park. 
I used a white pen to add accents to the little light bulbs and to the holly berries. 
Next is a card created with one of the Color Cue #10 at Wplus9 Designs.  What is cool about this challenge is that you have several color combos to choose from.


I picked this one although I would want to use everyone of them. 

This little guy is a stamp from My Favorite Things. I just love this little guys.
The cardstock for the card is Gemstones by Core'dinations.  It has a great, pearly, shiny finish.  I stamped snowflakes by JustRite stamps on white cardstock with white ink and embossed them with white embossing powder and then sprayed my piece with Chalkboard spray by Glimmer Mist.  The snowflake trim is my new Martha Stewart border punch. 

Thanks for visiting, Linda (lbpost)

SKETCH 195 – HOLLY JOLLY CHRISTMAS card

Materials:
Stamps – Courtesy of The Stamps of Life
Cardstock – Core Essentials/Core’dinations
Patterned paper – Winter Wonderland/Echo Park Paper Co. (both sides)
Black Versafine stamp pad
Clear embossing powder - Stampendous
Copic markers
White pen
Foam tape


SNOW ADORABLE card

Materials list:
Cardstock – Gemstone and Vintage/Core’dinations
Copic paper
Stamps – My Favorite Things and snowflakes/JustRite Stamps
Black Versafine stamp pad – Versafine
Clear embossing powder – Stampendous
White stamp pad- Joann
White embossing powder
Snowflake border punch – Martha Stewart
Circle template – Coluzzle
Self adhesive rhinestones – Queen & Co.
Copic markers

Monday, November 22, 2010

Voting and Stamping

As for the voting, will you vote for me at Sketchy Thursday if you have a minute? The voting goes until Wednesday and it is for being the December Guest Designer which I think would be so fun.
Now for the stamping part of my post.
The sponsor this week at Card Positioning Systems blog is Kitchen Sink stamps. Her stamps are always some of my favorites to work with.  And to make the stamps that I used this week even more fun, I was on the lookout this fall for some great, "go to" leaf stamps and I found them!!! LOVE this set, it includes a number of leaves all in the 3-4 step process that makes Kitchen Sink stamps popular.
The Kitchen Sink stamps are designed to use in her 3-4 step process but what I discovered about these leaf stamps if that you don't always have to use all of the layers.  The golden yellow stamps that created my background here are only one of the layers.  Another interesting thing about these leaves is that for the orange/brown ones, I used the second leaf in the set and the third and I used the same color ink for each layer. They are designed to use all three or four layers and to use different shades of ink for each layer to create the finished image. 
Another interesting accent to this card is that I used a piece of Core'dinations from The Chocolate Box collection. That means it is brown on the top side and the core and reverse side is red.  I used my Martha Stewart score board to score the lines in the bottom portion of the card and then sanded them to expose the red core.  A fun, easy and inexpensive technique. 
Now for a more Christmasy style of card, I used another leaf in the same set. 
This time I used all three layers and a different shade of ink for each layer.  I then sprayed over the piece with a green Glimmer Mist. 
 A close-up of the three layers. 
Gotta share a few photos too...
We pulled out the Halloween costume again to get some photos of the costume in the daylight.  This is the famous Dino-Bubbles slayer!!! He was very specific that he wanted to be a dinosaur with a sword.  His big sister pulled out the bubbles to help keep his attention while Grandma snapped the camera.
It is pretty funny too because our puppy dog thinks she is part of the action!!!

Our fearless Bubble Slayer!!!
Thanks for visiting, Linda (lbpost)

SKETCH 194 – THANK YOU card

Materials:
Stamps – Courtesy of Kitchen Sink stamps
Cardstock – The Chocolate Box/Core’dinations
Memento and Distress stamp pads
Martha Stewart Score Board
Corner rounder punch – Fiskars
Self adhesive rhinestones - Recollections
Sandpaper
Foam tape

SKETCH 195 – HOLLY JOLLY CHRISTMAS card
Materials:
Stamps – Courtesy of The Stamps of Life
Cardstock – Core Essentials/Core’dinations
Patterned paper – Winter Wonderland/Echo Park Paper Co. (both sides)
Black Versafine stamp pad
Clear embossing powder - Stampendous
Copic markers
White pen
Foam tape

Tuesday, November 9, 2010

Goodness, Goodness and MORE Goodness

And, most of the goodness comes from sketches but also from some great online challenges. 
To start off my post, I am showing you my Card Positioning Systems blog card for this week. Our sponsor is Paper Pretties and I just fell in love with this adorable little skating girl.  Notice that great embossed cardstock for the card base.  It is Core Impressions by Core'dinations. That means it comes with that embossed design in it already and I slightly sanded it.  They aren't snowflakes but they look like it here.
This set comes with several little snowflakes so I used some of them to create a snow scene.  The girl is colored with Copic makers.  Her handwarmer and ear muffs are accented with Glitter 3-D Fashion paint by Tulip. I love how that is just enough added glitter and bling.
For this card, I started out with the 2 Sketches 4 You sketch for this week.  Their sponsor is Layers of Color so I used a free digi download from LOC for my card, that is that great sentiment.  The flower is cut out of a piece of SEI patterned paper.  This great, golden orange flower plus the white space for the sentiment made this card fit in with the Moxie Fab Tuesday Trigger for this week and the colors fit with the Colour Q challenge. 
Once I downloaded the sentiment, I opened a WORD document and inserted it.  From here, I could size this to the exact size I wanted to work with. This download could be printed out just about any size and another great reason to use something like this is that I could make multiple cards by repeatedly printing out the verse. 
And, I also found time to play with the Card Patterns sketch.  This gave me a chance to use my new Wplus9 Designs Studios medallion stamps.  I thought they looked like they could be snowflakes. 
My very newest purchase is this great set of Spellbinder Nestabilities and I thought they were perfect to go along with the sketch.  I kept the Nestabilitie in place once the shape was cut out and embossed and sprayed it with some Glimmer Mist.  I did a little bit of accenting with a matching Copic marker. 
Gotta share some photos from this last week...
This last Saturday was my grandsons last soccer game of this season and in the last quarter he played the position of goalie. You can see by these photos that he really showed them how to do it. Just like this, he stopped the ball several times.
And had great form as he kicked the ball back into the game. 
Here is our little puppy today.  She has grown so much since we got her, she is now 6 months old and just as cute as ever.
I thought you might like to see where you can most often find our kitty cat! She is so intent as she watches anything that moves.
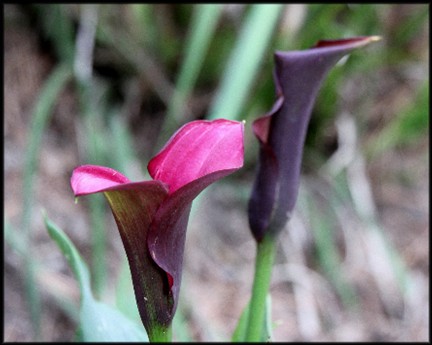
Plus, here is a photo of one of my  new Calla Lillies in our backyard. They are such a dark purple, some of them are almost black!
Thanks for visiting, Linda (lbpost)

SKETCH 192 – WINTER GREETINGS card

Materials:
Stamps courtesy of Paper Pretties
Cardstock – Core Impressions/Core’dinations
Patterned paper - BasicGrey
Versafine black stamp pad
Clear Embossing Powder – Stampendous
Copic Markers
Glitter 3-D Fashion paint – Tulip
Self adhesive rhinestones – Queen & Co.
Scallop circle punches and circle punches – PaperShapers
Sandpaper
Foam tape

BLESSED IS THE NATION… card

Materials list:
Cardstock – Core Essentials/Core’dinations
Patterned paper – Moonrise collection/SEI (the flower is cut from one pattern)
Digital stamp for sentiment – Layers of Color
Self adhesive gems – Queen & Co.
Foam tape – 3M
Sandpaper

HAPPY HOLIDAYS card

Materials list:
Cardstock – Core Couture and Core Essentials/Core’dinations
Patterned paper – BoBunny (both sides)
Rub-on sentiment – Making Memories
Border punch – Apron Lace/Fiskars
Snowflake stamp - Mehndi Medallions/Wplus9 Design Studios
Scallop Circle die cut – Spellbinders Nestabilities
Black Versafine stamp pad
Clear embossing powder – Stampendous
Blue Glimmer Mist spray – Tattered Angels
Buttons – PaperTrey, Inc.
Self adhesive rhinestones – Queen & Co.
Foam tape – 3M
Sandpaper

Monday, October 4, 2010

It was a Jillibean Soup day

That almost sounds like a Chicken Noodle soup day which it is here today since we got some rain after a week of heatwave and humidity!  I really do mean Jillibean Soup day though since last week I was soooo happy to be the Guest artist on the Jillibean Soup blog.  Jillibean Soup has so many papers and other products that I really do love so this was FUN!

All of these projects were posted on their blog but I wanted a chance to show you some of the details and to share a little bit of what I did.  For the first layout, I wanted to share this photo of my youngest grandson. I asked him to give me a smile and this is what I got. How priceless!  I thought this patterned paper with the little cameras on it was a great piece to use with it.  The SPROUTS that I used go right along with the theme.  Notice the red cardstock too.  That is Jillibean Soup Core Impressions by Core'dinations.  It comes with that great embossed design in it already. 


The letters that I had to use were white.  They do come in other colors but what I really do like about the white is that I can custom color them.  I sprayed these with red Memories Mist spray and I also rubbed them with a Fluid Chalk stamp pad. 
The little fish come on this piece of patterned paper. I add in some punched out little fish here and there, mine look more like sharks!  For my little square of photos, I created a collage in Picassa.  I cropped four photos in a square shape and then picked those four and created a collage. This is sooooo easy in Picassa.  I then added the white border around and between the photos.  Now I could print this out in the size I wanted.  I picked just the right size to fit in the space I had left.  This is so much easier then cutting four photos in perfect squares.  I did some machine sewing around this square for added interest. 

Again, me letters were white.  I colored them with spray color and by rubbing them with a Fluid Chalk stamp pad. 
How about that punched border? At first I wasn't going to buy this one and now I am very happy that I did. It is by EK Success.   
Probably my favorite supply in all that I used is the red and white herringbone sticker letters and the matching patterned paper.  I picked the letters to spell "joy" and made my card have a slight Christmas look to it.  The label is also a sticker.  The star is a die cut that they offer.  I rubbed it with a white stamp pad and then embossed that ink with white embossing powder.  This gives it a "snow" look.


The card base cardstock is more of the Jillibean Soup Core Impressions Core'dinations cardstock.  This piece is WhiteWash.  I slightly sanded it to expose the little design. 
The flowers are from another piece of Jillibean Soup Core Impressions Core'dinations cardstock. It has embossed flowers all over it and I just cut out three of them.  The buttons are actually stickers, they make the cutest flower centers. 

Thanks for visiting, Linda (lbpost)

Tuesday, September 21, 2010

That splash of RED!

I love working with color challenges but let me tell you, this one by The Play Date Cafe is over-the-top.  Not sure what I like most about this, the photo or that splash of red. 
In fact, the photo is one I would have taken if I had seen this adorable little house.

 Now, add to this wonderful color combo that the sponsor for TPDC this week is PaperBag Studios.  I have a couple of their stamps, so of course, I pulled them out.  Somehow that embossed, Core'dinations cardstock reminded me of the roof of the house and the white punched border reminded me of that cute little fence. 
I like this stamp because of the collage way the elements are put together on it,  but also because when you stamp it with black ink, there are a number of ways that you can add color.  Here I masked off part of the design so that I could spray the one side with red ink.  I colored the flower with Copic markers and added a coat of Aleene's Paper Glaze, so the flower stands out a little bit. 

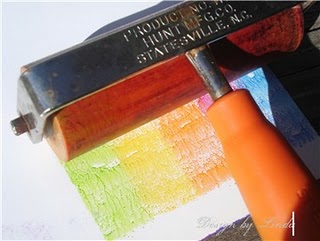
A long time ago, I used this stamp in another way  and I thought I would show you that one as well.  The background for this one was colored by running a brayer across a multi-colored stamp pad.  This works best with glossy cardstock but matte will work too. This is a fun way to create a background. 
Here is a little glimpse of what I mean by that.  The brayer is ran across the paper until a solid coat of color is applied then the image was stamped over that with black ink. 

Thanks for visiting, Linda (lbpost)

ABC - SISTERS card

Materials list:
Cardstock – Core Impressions/Core’dinations
ABC – Sisters stamp - Paper Bag Studios
Black Versafine stamp pad
Clear embossing powder - Stampendous
Copic markers
ChalkBoard spray – Tattered Angels
Red Spray color – Memories Mist/Stewart Superior
Clear Paper Glaze – Aleene’s®
Self adhesive pearls- Queen & Co.
Border punch – EK Success
Sandpaper