Showing posts with label Layers of Color. Show all posts

Friday, March 15, 2013

Yummy color combinations

I so love color challenges! It is so fun to get that little boost in my creative endeavors.
 I love to turn to Colour Q for inspiration. That is what prompted my first card for this post.
 I went to this flower stamp and matching die set from PaperTrey, Inc. I so love these flowers. In order to work with the colors, I pulled out various Clearsnap stamp pads. I love that these pads come in so many great colors.  The sentiment is from Layers of Color that does not exist anymore but since that artist is creating for Penny Black, I am hoping it will be released there soon.
 Here is the Colour Q combo, isn't it wonderful!!!
 Next up, I went to The Play Date Cafe color combination.  The cut border is cut with the Cricut as is the sentiment.
 I stamped the bottom edge with the Tweed background stamp from Hero Arts, inking it with a black, Clearsnap stamp pad. I then sprayed it with a bit of Smooch spray. 
This is The Play Date Cafe combination.
 

Thanks for visiting, Linda (lbpost)


Tuesday, October 25, 2011

Layers of Color Ornament Blog Hop

The beginning of the blog hop is at the
Layers of Color blog.
If you came here from Keri's blog,
you are hopping in the right order.

This is the place to discover the newest creative paper ornament ideas, be inspired by talented designers, and get showered with gifts! Layers of Color is giving away:

FREE Ornament Templates!
FREE Vintage Roses Ornament Tutorial! and
6 drawings for a $20 Layers of Color Gift Certificate!

First, my ornament inspiration!...

 I got to play with the ANGELIC set of stamps.  I picked up this wooden heart ornament at Michaels in all of their new products for Christmas projects. 

 I wanted to keep my stamped image very simple in the coloring so I used some of my very lightest Copic markers and kept the color combo very limited.  When I had it all colored, I sprayed it with some Smooch Spritz.  Plus I added some gold paint for the decoration at the neck line of their little outfits. 
I had downloaded a free piece of sheet music from Crafty Secrets and printed that out on white cardstock.  Next I took one of the stencils from Layers of Color and sponged it with brown ink.  I also sprayed this with the Smooch Spritz.  The outside rim of the wooden heart was painted with a pink paint and also spritzed so it wasn't too pink.
I also wanted to create a card using the same set of stamps so you could see more uses for the stamps.
I loosely used the sketch for this week at Card Patterns for my card.  The cardstock is two sided so I just used both sides.  That rub-on sentiment is from EAD Designs/Paper Smooches.

Again, I wanted to keep the image very simple in the coloring so I slightly colored the angel and then sprayed the entire image with the Smooch Spritz and cut it out.  LOVE the glimmer from the Spritz. I embossed the kraft colored corner with my Cuttlebug and the pink patterned paper is from Echo Park.  The corner is punched one time with a 4-in-1 Kreaxions punch.

GIFTS FOR YOU!...
Come get a FREE Vintage Roses Ornament Tutorial tomorrow, October 27th on Layers of Color blog!
  
Follow the directions at the Layers of Color blog as to how to enter for the prizes. Winners will be announced tomorrow! And there are more gifts for you!...
 
With every online purchase from Layers of Color boutique you will get an exclusive FREE Vintage Ornament Template designed by Laura Campbell! She made this sample using Glad Tidings art stamp set and Feather Twine. Your gift will be printed on cardstock ready for you to add your creative ideas with stamps and ink! Limited time only!


Let's get hopping to discover lots of gorgeous ornament projects to add sparkle to your Christmas preparations! There are drawings for $20 Layers of Color Gift Certificates as surprise gifts for you along the way, so be sure to visit each designer blog!
From my blog, hop on over to Linda Lucas' blog for more goodness.
 
Thanks for visiting, Linda (lbpost)

Saturday, September 3, 2011

Stickers and Stamps


 First off, I want to share my Unscripted sketch card with you.  Here is the sketch. 
 I really like the sketch this week.  It was simple and fun.  Part of the fun comes with the Little Yellow Bicycle supplies. 
 The fun flowers are stickers. I just love this particular collection of papers and stickers.
 My next card represents some "play time"! I love to experiment.  I placed a stencil down on plain white cardstock and sprayed this with the blue Chalkboard Glimmer Mist.  After I finished spraying, I realized that I had lots of spray on the entire stencil so I carefully picked it up and turned it over onto another piece of plain white cardstock.  All of that extra blue ink was now on my paper.  Next, with the stencil in place, I sprayed it with yellow so that they yellow Chalkboard Glimmer Mist colored the vine design in the stencil. I just loved the resulting combination.  I also colored white seam binding with the same yellow spray.
 The little butterflies are a stamp by Inkadinado.  I thought stamping them with the solid black was a good contrast.
And for a few photos...
 I am having a ball with my Hipstamatic camera app on my phone. I just stand and keep changing the lens and films!  We went to walk around our harbor the other day so I had to capture some photos of the boats.
 Here is another lens/film combo for a completely different look.
This photo is of some wind wheels. 
Thanks for visiting, Linda (lbpost)

SKETCH 122 – THANK YOU card

Materials list:
Cardstock – Core’dinations
Patterned papers and stickers – Little Yellow Bicycle
Rub-on sentiment – EAD Designs/Paper Smooches

YOU ARE MY REASON WHY card

Materials list:
Cardstock – Core’dinations
Border and corner punch – Martha Stewart
Ribbon – Really Reasonable Ribbon
Stencil – Layers of Color
Spray mist – Chalkboard/Glimmer Mist
Butterfly stamp – Inkadinkado
Stamp sentiment – Technique Tuesday
Self adhesive rhinestones – Queen & Co.
Black Versafine stamp pad
Clear embossing powder – Stampendous

Monday, August 29, 2011

Little birdies and a Yellow flower

First off, I wanted to share the card I created to go with one of the Sketch challenges at Moxie Fab
 I love to use sketches, so I am usually up for a challenge.  This challenge at Moxie Fab goes along with Card Ideas Week. 
 I pulled out this very "sunny" piece of patterned paper by Little Yellow Bicycle.  The sketch has the three banner looking pieces on it so I used one of my Kreaxions punches and made little decorative banners. 
 The reverse pattern on this particular piece of paper has these cute little quails all over it so I just cut out a strip of them to march across my card. 
 I also want to share my Card Positioning Systems card for this week.  Our sponsor is Clearsnap and I used Smooch Spritz.  I love spray colors so this is a product that I really like. 
 To get my pattern, I used a stencil by Layers of Color.  You can see that the spray color has a silver/metallic look to it.  I also cut a flower with a My Favorite Things die from white cardstock and sprayed it so that it is a great, metallic golden yellow.  I love how completely this spray colored my cardstock.
And for a few photos...
 I used the Hipstamatic app on my phone for these.  My grandson loves playing in this swing and so as I pushed the swing, I had my phone in my hand to snap these.  If you recall from my last post, this app is meant to give old fashioned looking photos. 

Thank you for visiting, Linda (lbpost)

THANKS BUNCHES card

Materials list:
Cardstock – Core’dinations
Patterned paper – Little Yellow Bicycle
Kreaxions 4-in-1 punch
Ribbon – May Arts
Rub-on sentiment – EAD Designs/Paper Smooches
Self adhesive pearls – Queen & Co.
Machine Sewing

SKETCH 233 – THANK YOU card

Materials:
Spray Inks courtesy of Clearsnap – Ice Rink and Candle Glow/Smooch Spritz
Flower Die Cut – My Favorite Things
Cardstock – Core’dinations
X-Press Blending Card – Copic Markers
Patterned paper – Die Cuts with a View
Pattern Stencil – Layers of Color
Rub-on sentiment – EAD Designs/Paper Smooches
Corner rounder punch – Fiskars
Brad

Monday, August 15, 2011

Winter and Summer all in one post!

First of all I really need to give a little movie review! We went to see The Help and I so recommend it. It is wonderfully done with some amazing actors just be prepared because it is also emotional.  We were so excited for it to come out and it sure did not disappoint.
Now, onto some cards.

 First up, my Card Positioning Systems card for this week. My Favorite Things stamps is the sponsor. I LOVE their stamps so this makes me very happy. It was also pretty fun to work with a "winter/cold looking" card in the middle of summer.
That wonderful, decorative, die shape is a Spellbinders Nestabilities. 
 Next up, my Unscripted Sketches card for this week. Now talk about a challenge!!! But since I love challenges, I was up for it.
 I pulled out this amazing collection of supplies by Little Yellow Bicycle. I LOVE these papers, die cuts and stickers.  The punched bottom corners are done with a Kreaxions 4-in-1 punch.
 Doesn't this combination just make you happy?
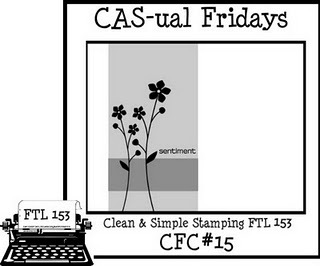
 And, I also found some time to play with a challenge that I have never played with before, Cas-ual Fridays.
 I felt like this challenge gave me permission to just create something simple and it was so fun. 
 I thought the combination of this doily stamp and the leaf sprig was fun.
And for a few photos...
 I mentioned the other day that we took a little trip to San Diego to go to the zoo.   To make our trip a little more interesting for our 3 year old grandson, we took the train there.  He wasn't supposed to be running but of course, he is cute in about anything he does, so Grandma had to get a photo!
If you have never been in the train depot in San Diego, I wanted to share how gorgeous it is. These wonderful tile walls are all around the inside of the station. 
Thanks for visiting, Linda (lbpost)

SKETCH 231 – SENDING A FLURRY OF LOVE card
Materials:
Stamps courtesy of My Favorite Things
Cardstock – Core’dinations
X-Press Blending Card – Copic Markers
Patterned paper – Fancy Pants and My Mind’s Eye
Spellbinders Nestabilities
Copic markers
Glitter 3-D Fashion Paint – Tulip
Black Versafine stamp pad
Clear embossing powder

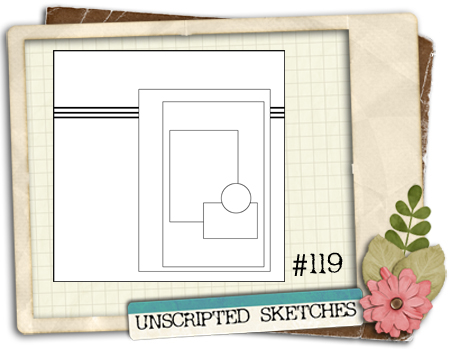
SKETCH 119 – SUNNY DAYS AHEAD card
Materials list:
Cardstock – Core’dinations
Patterned papers and stickers – Little Yellow Bicycle
Rub-on sentiment – EAD Designs/Paper Smooches
4-in-1 punch – Kreaxions
Mini brads - Doodlebug

FUTURE IS AS BRIGHT… card
Materials list:
Cardstock – Core’dinations
Patterned paper – Graphic 45
Stamps – Layers of Color, Wplus9 Designs and PaperTrey, Inc.
Black and Jasmine stamp pads – Mix’d Media Arts/Clearsnap
White and Clear embossing powder – Stampendous
Copic markers
Self adhesive pearls – Queen & Co.

Wednesday, August 3, 2011

Blessings to a True Friend

I had a few extra minutes last night so I went on a search for some ideas for a card to create.  I found a color challenge and a sketch.
 The current Card Patterns sketch...
And this totally wonderful colour combo at Colour Q...
 I recently won some stamps from Layers of Color and I wanted to give this adorable little wire tea cup and the flowers a try. This is two different stamps plus a word from another set.
To go along with the colors in that combo, I stamped the tea cup with white ink and embossed it with white embossing powder and then watercolored it.  The white stamped lines act as a resist.  I also sprayed it with some Glimmer Mist Chalkboard spray.  The flowers were stamped with black and embossed with clear embossing powder and then colored with watercolor crayons. 
 I also wanted to share my Card Positioning Systems (CPS) sketch card for this last week. Our sponsor this week is Clearsnap and we got to play with some brand new inks, Mix'd Media Inx.  I LOVE these things.  They are very wet and the color selection is pretty neat. 
 I wanted to really show off the colors so I pulled out my most favorite flower stamp by PaperTrey, Inc.  After I stamped the flower and leaves with the black ink, I embossed them with clear embossing powder and then "colored" the flowers and leaves by rubbing the paper with the stamp pads.  I was careful to not color the flower completely so some white still showed through.  I used three different colors for each flower. 
I loved coloring the flowers this way because of how fast it is to just rub the ink onto the paper.
Thanks for visiting, Linda (lbpost)

BLESSINGS card

Materials list:
Cardstock – Core’dinations
Patterned paper – Die Cuts With a View
Stamps – Layers of Color
Black stamp pad – Verafine
White stamp pad – Joann Craft store
White and Clear embossing powder – Stampendous
Border punch – Martha Stewart
White Enamel paint – Ink Essentials
Watercolor crayon
Watercolor brush
Foam tape – 3M
Self adhesive pearls – Queen & Co.


SKETCH 229 – TRUE FRIEND card

Materials:
Inks courtesy of Clearsnap – Peridot, Honey, Chiffon, Truffle and Black/Mix’d Media Inx ColorBox
Cardstock – Core’dinations and Bazzill
X-Press Blending Card – Copic Markers
Stamp set – PaperTrey, Inc
Patterned paper – My Mind’s Eye
Clear embossing powder – Stampendous
Corner rounder punch – Fiskars
Self adhesive pearls – Queen & Co.

Thursday, July 28, 2011

Encourage a Friend

I love using scripture verses on cards to friends.
 I did make this to tell a friend "Thank You" but I wanted to share it with you before I put it in the mail.  I love this verse and there is a song that goes with those words so I am finding myself singing that now that I have stamped it. The verse is from a new set of stamps by Layers of Color stamps. 
 The flower and leaves are stamps from PaperTrey, Ink. This just might be my most favorite flower stamp.  I colored that with Copic markers.  That great doily is from a set of doilies by Martha Stewart that I found at Joanns Craft store and those papers are new from Die Cuts With a View. The entire collection is soooo cool.
And for some photos...
 We stopped along the California coast - this view is at Fort Bragg.  I loved the color of the water. 
 Another view
 And, the reason we stopped at Fort Bragg is the wonderful and amazing Glass Beach.  Yes, the sand is more polished glass then sand.  The pieces are really small, but fun nonetheless.  The story goes it was an old dump or something.
And, how is this for a weathervane? LOVED it.
Thanks for visiting, Linda (lbpost)