Thursday, January 6, 2011

Hearts and Sea World

I know that post title makes no sense whatsoever but my post is two parts and those are the two parts, that simple!

I wanted to share my Card Positioning Systems card for this week, that is the "HEART" part. The Stamps of Life sponsored the sketch this week and so I was able to play with this amazing set and I combined that with a simple piece of gray Core'dinations cardstock that was embossed with dots!
I stamped the little frame and the scribble heart of white cardstock using white ink and white embossing powder.  That was then colored by rubbing it with stamp pads and spraying it with ChalkBoard Glimmer Mist. The white embossed design resisted the stamp pad inks and the spray. 
Now for the SeaWorld part of the post...
During the Christmas holidays in 2009, we went to SeaWorld with some of our family. I put together a very simple little mini album that would be easy for little hands to handle.  I cut the pages from chipboard and used little accents of Core'dinations cardstock and WeRMemory Keepers patterned papers. 
For the first page in the album, I used a picture that I took of the Holiday banners at the park and I added in the words to the photo before printing it out.  What an easy way to do a title.
I combined small photos along with larger photos so I could get in as many pictures as possible.

This is the last page, a photo of our group and the year.
And, these are in my yard today! For some reason, Pansy's grow really well here during the winter even with the cold days we have had this season. 
It is almost like they are growing like weeds. Just thought I should make someone out there a little jealous!

Thanks for visiting, Linda (lbpost)

SKETCH 199 – LOVE card

Materials:
Clear stamps courtesy of The Stamps of Life – hearts 2 love set
Cardstock – Core Essentials /Core’dinations
Copic paper
Cuttlebug embossing folder
Black Versafine stamp pad
White stamp pad – Joann craft store
White and clear embossing powder - Stampendous
Chalkboard Glimmer Mist – Tattered Angels
Copic Markers
Circle and scallop circle punches – PaperShapers
Corner rounder punch - PaperShapers
Self adhesive rhinestones – Mark Richards, Inc.
Scrap Dots – Helmar
Sandpaper

Wednesday, January 5, 2011

A "LOVE" Flower Soft blog hop

Starting Wednesday morning, this week’s Flower Soft Sprinkle Challenge & Hop (FSC19) is
 I Love Flower Soft!
This week the Flower Soft girls are dishing
out a Looooooove Challenge!
Make a card in a Valentine or Love theme.

Entries must be uploaded to the SCS gallery and use at least one Flower Soft product (Flower Soft, toppers, stamps) to be eligible to win. Please use the keyword FSC19 and flowersoft (one word) when uploading to the gallery so we can find your project.
Entries will be accepted for the challenge until 6:00am CT on January 14th. The SCS winner’s card will be featured on the Flower Soft blog on January 14th!

The prize this week – New Flower Soft colors! Meadow, Peony Pink and Marigold:

Want even more inspiration? There is a new episode of Flower Soft TV every Friday. To register for announcements, contests and specials at Flower Soft TV go to http://www.flower-soft.tv/#information.html and then click green "REGISTER" button.

Hop starts at the Flower Soft Blog

My card combines the Sugar Cookie collection by Nikki Sivils, Scrapbooker and some PEONY PINK Flower Soft. Notice the card base is Chocolate Box cardstock by Core'dinations.  It is brown on the front side and pink on the inside.

Is that PEONY PINK Flower Soft for the sprinkles on the cookie just plain CUTE! That is one of the new colors.

(TIP) The Flower Soft containers come very packed and compact with Flower Soft.  It needs to be fluffed before using. The way I do it is to have a large, paper clip that is partially opened and I use the opened end to stir the top portion of the Flower Soft making some of it fluffy and ready to use.

From my blog, hop on over to Debbie's blog for more goodness

Thanks for visiting, Linda (lbpost)

COOKIE HEARTS card

Materials list:
Cardstock – Chocolate Box/Core’dinations
Patterned paper and die cuts – Sugar Cookie collection/Nikki Sivils, Scrapbooker
Flower Soft – Peony Pink
Tacky Glue - Aleene’s®
3D Foam squares – Scrapbook Adhesives by 3L
Sandpaper

Sunday, January 2, 2011

Lots of Core!

I am finding it pretty hard to imagine we are on our way into the year 2011.  It is going to take a bit of time to get used to writing that new year.  It is also really cold here so we are off to a kind of weird start for us. It is good though as today was my husband's birthday and almost all of our kids and grandkids got together to have lunch with him. It doesn't get better then that.

Have you played with Core'dinations cardstocks before? Let me tell you, it is a whole ton of fun.
This card that I want to share with you today is my Unscripted sketch card for this week.  The team was to go back over the sketches of the past and pick one to work with. This was fun for me since I haven't been part of the team for a real long time, so there are alot of sketches I haven't worked with.  I picked sketch #15.  I love to work with circle designs so this was stood out. This card also shows off a bunch of Core'dinations goodness.  The gray/woodgrain card base is actually a piece of Core Impressions. It comes with the woodgrain design in it.
The white piece is embossed with a Sizzix embossing folder and the black circles are punched from Vintage Core'dinations and embossed with a Cuttlebug embossing folder.  I love the masculine look of that folder.  The little screws are really brads. 
As it turns out, I had created a layout using that same sketch as my inspiration, I just needed to use this layout for Core'dinations promotions so I couldn't show it back when that sketch was first used. 
This also shows off all kinds of Core'dinations techniques.  The circles are all embosssed and sanded using Black Magic Core'dinations and the background of the layout uses a piece of Vintage with lines added with a Score Board and then sanded. 

Thanks for visiting, Linda (lbpost)

Sunday, December 26, 2010

Snow at your house?

We won't be getting any snow here at our house but I can still make snow-themed cards.

This card is my Unscripted Sketches card for this week.  I love these Echo Park Paper Co. papers.
I embossed the white cardstock for the top portion of my card and the big swirl is accented with Tulips Glitter 3-D Fashion Paint. I just love what this stuff does to add some interest to a card.
This is my Card Positioning Systems sketch card for this week. We were to pick out a sketch from the past for our last card of the year. 
I used a JustRite stamp for my circle accent, a really cute snowman.
And for a few photos...
Do these look YUM? Some Christmas cupcakes from one of our cupcake stores.
One little preview of our Christmas day.  This was HIGH on his Christmas list! He is in awe of semi trucks these days.  Isn't it the best to actually get what you asked for?
This is what our yard looks like right now, no snow but LOTS of leaves!

Thanks for visiting, Linda (lbpost)

SKETCH 87 – SNOW-SNOW card
Materials list:
Cardstock – Core Essentials/Core’dinations
Patterned Paper – WinterTime/Echo Park Paper Co.
Cuttlebug embossing folder
Glitter 3-D Fashion Paint/Tulip
Self adhesive pearls – Queen & Co.
Sandpaper

SKETCH (Pick One) – SLEDDING SNOWMAN card

Materials:
Cardstock – Core Essentials and Vintage/Core’dinations
Copic paper
Patterned paper – Martha Stewart
Stamps – JustRite stamps
Memento

Clear embossing powder – Stampendous
Copic Markers
Circle and scallop circle punches - PaperShapers
Rhinestone swirls – Prima

Tuesday, December 21, 2010

Almost time for Santa

If you have a minute, will you vote for my card at Scrapbooks, Etc.? You can vote everyday this week, THANKS!!!

And I have just enough time to share a couple more projects with you. 
First off, my Card Postioning Systems card for this week.  I turned the sketch on it's side and used a brand new stamp set I have from Pink Persimmon.  I cut a little bit off of a piece of the "loopy" shaped paper for an edge. 
 I started out stamping the tree image on white cardstock with white ink and I embossed that with white embossing powder.  Now I could apply various color mediums over this stamped image and the image will act as a resist.  I rubbed it with stamp pads first.  Next I created a mask for the tree image itself and sprayed the paper with Glimmer Mist.  The reason I did this was that I wanted the area where the words were to be a lighter blue and the area around that to be a little bit darker blue.  The masking protected where the white words are and since my mask is in a tree shape, I helped further the thought that the words were in a tree shape. 
Another project I wanted to share is this very simple little accordian fold album.  We did a little photo shoot with our youngest grandson and of course, every photo was adorable!!
The album base was purchased, 4"x6" photos fit on each piece of the folds perfectly.  What is nice about that is that all that was then required was a very simple amount of additional accents. 
 I just added rub-ons and sticker letters here and there.
What a fun way to remember our Santa Baby. 

One more Disneyland Castle photo with the Christmas fireworks show.

Thanks for visiting, Linda (lbpost)
And may you all have an amazing holiday with family and friends.

Sunday, December 19, 2010

Holiday Time

Holiday time means so many things and one of those things is Christmas cards and Christmas presents.  I so love creating them so I, of course, want to share them with you.

For this first project, I used a great download from Flower Soft.  It has little round designs, one for each of the 12 days of Christmas but it is called the 12 Bears of Christmas.  Each one comes with a matching round design that has the words for each day on it.  These are so easy to print out and then I just punched mine out.  I decided to create one card with one of them but I could see making ornaments and having each one 2 sided or creating a really cute banner. 
I added some Sunshine Yellow Flower Soft to the little bears skirt, shoes and hair bow plus around the other circle as an accent. Add the Flower Soft with a generous layer of Aleene's Tacky Glue.  It is so fun what a little bit of Flower Soft adds to an image. 
For my next project, I used one piece of scallop circle patterned paper from Nikki Sivils, Scrapbooker's Christmas collection, Holly-Jolly.  I cut the one scallop circle in half and then folded each of these two pieces in thirds and glued the bottom edge.  How cute are these for holding a gift of candy or even some money or a small gift.
This cute nutcracker is a die cut that is cut out of one of the pieces of patterned paper. 
This set of trees is cut from the same piece of paper. 
And, get ready for this!!!
Our youngest grandson is irresistible all of the time but I don't know if it can get better then this with his stylin' sunglasses and his new hat. 
His Aunt Mandi captured this look!
Thanks for visiting, Linda (lbpost)

Friday, December 17, 2010

Do you Deboss?

Core'dinations blog is hosting a 12 days of techniques using Core'dinations cardstock.  My day was to use the technique of DEBOSSING.   (There is a give away each day too, so be sure to visit to see the great projects and to enter to win)
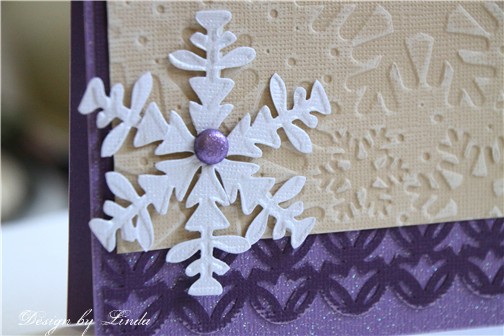
Embossing is so popular right now, especially with the embossing folders that several different companies are selling. Debossing is just the reverse image of that embossing. SO, embossing is indenting an image into the back of a piece of paper, debossing would be making the indent on the top side of the paper.  Because you would want to do this on the front side of a piece of Core'dinations cardstock so you can sand you design, I simply embossed my piece with my paper in the Sizzix embossing folder, backwards.   
The snowflakes are then "indented" into the paper, it is a reverse design.  This way I could still sand my Core'dinations cardstock on the front to further expose that design.   

I did the same with the snowflake.  This is a 2-step die and embossing folder set.  I just embossed it backwards.  That bottom edge is a border punch and I used new Core Couture glitter cardstock for the card base. 
And for a couple photos...
We visited a Historic House in Camarillo for a Christmas party this last week.  Here, Aunt Mandi holding our youngest grandson as they enjoyed the decorations. 
Aunt Mandi and her husband were actually married at this house so it was really special to go see it decorated for Christmas and being able to get a little tour of the amazing rooms and their decorations. 

Thanks for visiting, Linda (lbpost)