Showing posts with label Scrapbook Adhesives 3L. Show all posts

Sunday, May 16, 2010

My 3-D "out of the box" project

Vicki Chrisman from This Art That Makes Me Happy emailed me recently. She was issuing a challenge to anyone that would like to take part, to create a project that would be "out of the box" for them. I love challenges so I was in. I knew right away what I was going to work on too. I had just picked up this little wooden shadow box at Ross and it would have sat in my craft room for a long time probably except for the challenge. I took lots of photos of two of our grandkids playing outside on a rainy day. Our grandson is soooo busy, so I could envision cutting photos of him out a few times in different poses to try to show that "busyness" in my little scene. My "out of the box" challenge was to try to create depth with layers. I wanted the finished project to be as 3-D as I could get it. All of the products used are by Nikki Sivils except for the black title letters.
I am showing you a whole lot of different angles of my project so you can get the feel of how I did create the 3-D look. I gave my raindrops and clouds added accent with Aleene's Paper Glaze on the raindrops to give a "water" look and Glitter 3-D Fashion Paint by Tulip for the glitter accents on the clouds.
I wanted to cut the kids out in silhouette because little cut out kids are just plain the cutest and that helps give the look of motion. Here, this cut out figure is on the fourth level. Behind the umbrella are three layers of foam tape pieces and behind his legs is one level of foam tape.
When you look down inside my levels of grass and kids, you can see the foam tape. I just piled two or three pieces right on top of each other, depending on what level each thing was on. One level of grass was glued right to the background, the other level of grass has two layers of foam tape on it.
The piece that is both of our grandkids are added with one layer of foam tape.
See how I entertwined the kids between the different layers.
This view lets you see better how the first level looks.
Let me tell you, this was FUN! I love to experiment so that was one thing I was able to do a little bit of in order to make this work out like I wanted. Isn't that little tiny bee print the cutest for a background?
Thanks for visiting, Linda (lbpost)

RAINY DAY 3-D SHADOW BOX
Materials list:
Wooden shadow box – Die Cuts With a View
Cardstock – Core Essentials/Core’dinations
Patterned papers – Bee 2 Bee, Bee Strips, Day Dreamer: Willow Bee Collection and Butterfly Rest: Flaming Butterfly Collection/Nikki Sivils Scrapbooker
Glitter 3-D Fashion paint/Tulip

Clear Paper Glaze – Aleene’s®
Sandpaper

Foam tape – 3M

Monday, May 3, 2010

Chairs and Windows - Looks like Home

The first order of business in this post is to announce who the winner of the Nikki Sivils products is from my blog. It was so wonderful to have so many of you visit on National Scrapbook Day and as usual, I wish I was picking every single person who commented!
The winner is: Amber - Ambrosia Designs
She will be receiving an amazing package of scrapbooking supplies from Nikki Sivils scrapbooker.
***
The Moxie Fab blog is having a challenge to create something with a chair on it so here is my card.
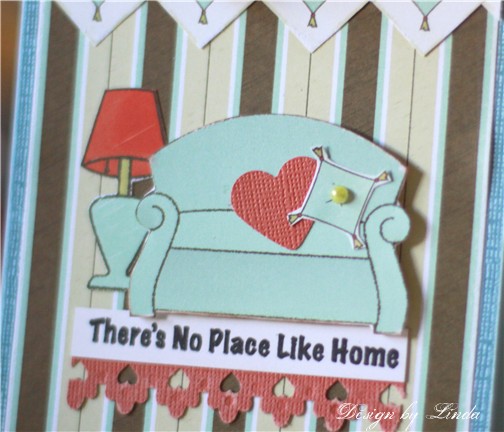
Nikki Sivils scrapbooker has this cute collection called Victoria's Street and it has chairs in it, how perfect is that? That top little border is cut from the patterned paper that has pillows all over it.
The chair, lamp and pillow are cut from one of the patterned papers and the stamp is from the Nikki Sivils Victoria's Street stamp set.
And I wanted to share my Card Positioning Systems card for this week. Taylored Expressions is our sponsor and the stamp set I used has this adorable window in it.
Notice this totally amazing wood grain cardstock for the card base? That is new from Core'dinations and Cosmo Cricket. All it took was a little sanding to expose that great wood grain embossed design.
***
And a couple photos. I stopped by one of our beaches this last week. I thought these two photos were kinda fun. They are from the same spot but one focuses on the wood fence and one focuses on the water. I loved the contrast in the two looks.

Thanks for visiting, Linda (lbpost)

THERE’S NO PLACE LIKE HOME card
Materials list:
Cardstock – Core Vintage/Core’dinations
Patterned paper and stamp set – Victoria’s Street/Nikki Sivils Scrapbooker
Sandpaper

Black Versafine stamp pad
Martha Stewart border punch
Ribbon
3D Foam squares – Scrapbook Adhesives by 3L
Self adhesive pearls – Queen & Co.
*
SKETCH 165 – WELCOME WINDOWSILL card
Materials:
Cardstock – Cosmo Cricket Core Impressions/Core’dinations

Curious Iridescent Cryogen White/CutCardStock.com
Patterned paper – Measuring Up/Cosmo Cricket
Stamps courtesy of Taylored Expressions – Fresh Flowers
Copic Markers
Black Versafine stamp pad
Clear embossing powder – Stamps n’ Stuff
Self adhesive Pearls – Queen & Co.
Border punch – Martha Stewart
Corner rounder punch – Fiskars
3D Foam squares – Scrapbook Adhesives by 3L
Sandpaper

Thursday, April 15, 2010

All about Orange

Not sure how it happened but my post today is full of shades of ORANGE! It has to be good, right!?
First of all, I want to share what I came up with to go with the Colour Q color challenge #28 for this week. Again, I just love the way they pictured the colors.
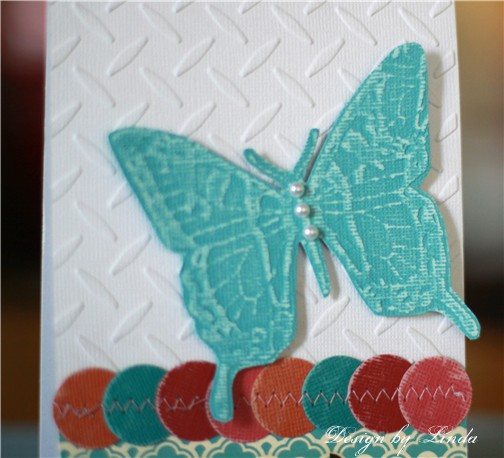
Because white is one of the colors, I made that my card base and embossed it with a Cuttlebug embossing folder. The embossing makes this card also fit the Little Red Wagon challenge #24 for dry embossing.
Can you believe this butterfly!? It is actually just cut from a piece of new Jenni Bowlin Core Impressions Core'dinations cardstock. This particular piece of cardstock has embossed butterflies all of it in different sizes. I simple cut out one of them and sanded it to expose the embossed image.
And, I also wanted to play with the Card Patterns sketch #59 this week. Their sponsor is Hero Arts so I pulled out some of my Hero Arts stamps to go with the sketch.
Once again, I pulled out my wood grain background stamp. I love that is looks neat is about any color you stamp it in. Here I picked a cranberry color. I did spray that with a couple different colors of Glimmer Mist and then added a flourish stamped image over that.
The white piece is embossed with a Cuttlebug embossing folder. By rubbing it a little bit with a Fluid Chalk stamp pad, I added some color over the embossed design. The butterfly is colored with Copic markers and I added little bits of Aleene's Paper Glaze to the black portions of the butterfly to add a glass-like look.
****
And my husband and I went on a fun adventure this last weekend to see the poppy fields. We drove over to the Leona Valley area just outside of Palmdale, CA. For as far as you can see, you see blankets of orange. This is the peak season for that and it was truly amazing.


This is a close-up of some yellow wildflowers that were scattered in the orange poppies.
Thanks for visiting, Linda (lbpost)


HUGS & KISSES card
Materials list:
Cardstock – Core Essentials and Jenni Bowlin Core Impressions/Core’dinations
Patterned paper – Fly a Kite: Sprinklers/October Afternoon
Sentiment sticker – SRM stickers
Cuttlebug embossing folder
Circle punch – Papershapers/EK Success
Corner rounder punch – Fiskars
Self adhesive pearls – Queen & Co.
Machine sewing3D Foam squares – Scrapbook Adhesives by 3L
Sandpaper
ALL YOURS card
Materials list:
Cardstock – Core Essentials/Core’dinations
WoodGrain background stamp, flourish stamp and butterfly stamp – Hero Arts
Cuttlebug embossing folder
Copic Markers
Glimmer Mist – Tatterned Angels
Scallop oval punch - Marvy
Apron Lace border punch – Fiskars
Self adhesive pearls – Queen & Co.
3D Foam squares – Scrapbook Adhesives by 3L
Curious Iridescent Cryogen White/CutCardStock.com
Clear Paper Glaze – Aleene’s®

Monday, April 12, 2010

What do Christmas and Birthdays have in common?

Both are part of my post for today! I always love the theme of Christmas in July when it comes to thinking ahead of the holidays so I made my own celebration with Christmas in April!
I LOVE the adorable, vintage look of these October Afternoon Very Merry Wild cards and so I made this one the focus of my Card Positioning Systems card for this week.
Notice the dot embossed cardstock for the card base. It is new from Core'dinations and Jenni Bowlin. So easy to use with just a bit of sanding.
***
NOW, hold onto your hat because I have birthday photos to share. When the family was together for Easter, we had an early birthday party for him.
Everyone was gathered for him to start opening presents and they gave out a cheer for him and it was so adorable that he just joined in! The birthday stuff is a whole new adventure you know.
His mom pulled out the birthday cake so everyone could ohhh and ahhh and before anyone knew what was up, he was ready to lick the cake! Of course, I had to catch a photo in that split second before we caught him.
After he blew out the candles, he was holding them up to show us how old he is now, 2 years old.
He got the first slice, one of the ends.
Here is a good photo of the cake before the candles were added and before we cut into it. It was so cool looking and he just loved it.
Thanks for visiting, Linda (lbpost)
SKETCH 162 – Christmas Joy card
Materials:
Cardstock – Jenni Bowlin Core Impressions/Core’dinations
Patterned paper – Thrift Shop: Great Find and Very Merry: Sing the Carols/October Afternoon
Very Merry Wild Cards – October Afternoon
Circle punch - Papershapers
Corner rounder punch - Fiskars
Sandpaper
Glitter brads - Doodlebug
3D Foam squares – Scrapbook Adhesives by 3L
BIRTHDAY BOY card
Materials list:
Cardstock – Core Essentials/Core’dinations
Patterned paper – Fly a Kite: Fireflies (dots) and Fly a Kite: Dandelions (numbers strips) and Fly a Kite: Ice Cream (circle)/October Afternoon
Sentiment sticker – SRM stickers
Zig Zag scissors
3D Foam squares – Scrapbook Adhesives by 3L
Sandpaper

Friday, April 9, 2010

Black, White, Red, Green, Purple

What do those colors have in common? Just my two cards that I want to share today.
This card came about because I wanted to use the Get Sketchy sketch #32. This is a brand new to me sketch blog that I found recently and I just had to use this banner stamp on it. It was like the sketch was made to go with the banner! Notice the NEW Jenni Bowlin Core Impressions cardstock for the card base. Just takes a bit of sanding and the design shows up.
I combined the round, rosette stamp, the Dutch Journal circle stamp, the banner stamp and the sentiment stamp, all from Pink Persimmon.
(here is a little secret about the sentiment stamp in the banner. The sentiments come with an arch shape to them to fit in the banner when it is stamped in one direction. I wanted the banner to fit in the opposite direction and so because the stamps are clear and cling, they are flexible enough that I could form them to arch the other way so that that arch matched the banner)
They were all stamped with the black Versafine stamp pad and all embossed with clear embossing powder.
And, I also wanted to play with the new Play Date Cafe color combo. Who can resist purples!!!
Now, the real deal is the colors are plum, lavendar and cream but I just had to throw in the green. WHY? Because this piece of green plaid patterned paper was sitting on my desk, just staring at me and I figured I could make the color combo my own by adding in the greens.
I had to figure out how to combine the greens and the purples and so I cut these flowers out of this Little Yellow Bicycle patterned paper and that did it. I cut out two sizes of flowers and layered them together with the foam squares in between. Notice my little scallop ruffles.
***
Gotta share some photos too.
We have a place in Thousand Oaks, CA called Gardens of the World. It is just there for the publics enjoyment. I have found that any time of the year is wonderful to walk around there with my camera because it is new anytime.
I spent a good deal of my time on this trip around the Koi pond. LOVE the way these lily pads looked against the water.
When the sun was just right on the water and the fish were at just the right depth, I was able to catch amazing photos of them. They are just so beautiful.
And, I was taken with the white lilacs in full bloom. As a child, one of my mom's favorite flowers were lilacs. Every year se would walk around the block to pick some so these reminded me of my mom who has been gone for awhile now.
Thanks for visiting, Linda (lbpost)

HAPPY BIRTHDAY card
Materials list:
Cardstock – Core Impressions/Core’dinations

Curious Iridescent Cryogen White/CutCardStock.com
Patterned paper – BasicGrey and My Mind’s Eye
Stamps – Banner Outline, Vintage Greetings and Dutch Journal circle/Pink Persimmon
Copic markers

Black Versafine stamp pad
Clear embossing powder – Stamp n’ Stuff
Self adhesive pearls – Queen & Co.
Machine sewing
Sandpaper

THANKS A BUNCH card

Materials list:
Cardstock – Core Essentials/Core’dinations
Patterned paper – Little Yellow Bicycle and Cosmo Cricket
Rub-on sentiment – Deja Views
Scallop scissors
Ribbon3D Foam squares – Scrapbook Adhesives by 3L
Sandpaper
Machine Sewing
Pearl Brad - Recollections

Wednesday, April 7, 2010

Do you use Flower Soft?

The Flower Soft team is having a blog hop today and do you know why? We want to share with you wonderful ways to use Flower Soft products.
Our challenge for this blog hop is to use Moments in Time products from Flower Soft because they offer some other pretty neat supplies besides their wonderful little jars of Flower Soft. I used a stamp from the Moments in Time collection. This collection has stamps and card toppers in it. You can check out the other goodies in this line on the Flower Soft web site and of course, you can check out what the other design teams members came up with to show you. I stamped the little girl playing with her kitty cat two times. The first time on white Curious Iridescent Cryogen cardstock and then a second time on a page torn from a very old dictionary. Both were stamped with a black Versafine stamp pad and both were embossed with clear embossing powder. Next I cut just the dress portion out of the old dictionary page image so that I could glue that in place over the image stamped on the white cardstock.
You can see from this close-up that I added Ultra Fine Flower Soft to the tied belt on her dress, to portions of the kitty cat's fur and to the flowers on the ground. Remember that the Aleene's Tacky Glue is the best and most effective way to adhere the Flower Soft. I wanted to keep my coloring very subtle so I used soft colors on portions of my little girl. I then placed an oval piece of cardstock over the colored little girl image and sprayed my paper with green Glimmer Mist. This gave just the right finish to my project.
My card base is a piece of Core Impressions Core'dinations cardstock. Below is a picture of the package that that comes from. It is already embossed with a design and then all it takes is a little bit of sanding to expose that design. This package is in coordination with Cosmo Cricket designs.

From here please hop on over the Jennifer Buck's blog.
Thanks for visiting, Linda (lbpost)

HAPPY BIRTHDAY card
Materials list:
Cardstock – Cosmo Cricket Core Impressions/Core’dinations

Curious Iridescent Cryogen White/CutCardStock.com
Patterned paper – Cosmo Cricket (both sides)
Page from an old dictionary
Rubber Stamp – Purr-fect/Moments In Time/Flower Soft
Ultra Fine Flower Soft – Sage, Koala Grey and StrawberryTacky Glue – Aleene’s®
Versafine black stamp pad
Clear embossing powder
Copic Markers
Glimmer Mist – Tattered Angels
Rub-on sentiment – Deja Views
3D Foam squares – Scrapbook Adhesives by
Sandpaper

Friday, April 2, 2010

It is Challenge time again

You got it, a post full of online challenges! And the first one is just in time for Easter.So far, the Colour Q color challenges that I have checked in on are just plain IRRESISTIBLE! Don't you even want those cute little booties! I combined my effort with the Moxie Fab Tuesday Trigger because that was also pretty irrestible this week. And with Easter around the corner, I created a little candy treat bag.
You can see here how this has a couple little candy bars tucked inside.
I created my egg to match the wonderful eggs that are pictured in the Moxie Fab Tuesday Trigger.

1. I started with my Judi Kins damask stamp.
2. I stamped it with a white stamp pad on white cardstock.
3. That was embossed with Clear embossing powder. (for my first try, I embossed it with white embossing powder but I wasn't as happy with the result. The white embossed image seems to want to hold onto more of the purple ink instead of resisting it like I wanted)
4. I then rubbed my paper with a purple Fluid chalk stamp pad. I did this enough to color my white cardstock purple.
5. The embossed image acts as a resist, I rubbed the stamp pad ink off of the image.
6. I then sprayed this piece with purple Glimmer Mist. This made the purple more intense and gave the slight glimmer that comes with Glimmer Mist.
7. This was then cut out in an oval or egg shape.
***
Now onto the Unscripted Sketches sketch #48 for this week.
I pulled out some Nikki Sivils Scrapbooker stamps and papers. I also turned the sketch upside down because it just seemed to work best for me that way.
My little row of houses are stamped with white stamp pad ink and embossed with white embossing powder. The little dotted border piece is a piece of Core'dinations Chocolate Box cardstock embossed with a Swiss Dot embossing folder.
***
And, the Card Patterns sketch #57 for this week. I just changed the size of my card.
All of the flowers are rub-ons by Creative Imaginations.
Thanks for visiting, Linda (lbpost)


EASTER EGG CANDY HOLDER card
Materials list:
Cardstock – Core Essentials/Core’dinationsCurious Iridescent Cryogen White/CutCardStock.com
Patterned paper – Cosmo Cricket
Damask stamp – Judi Kins
Apron Lace border punch – Fiskars
Embossing folder – Stampin’ Up
Fluid chalk stamp pad – Clearsnap
Purple Glimmer Mist – Tattered Angels
Martha Stewart Score Tool
Scallop scissors – Family Treasures
Self Adhesive rhinestones – Queen & Co.
Ribbon


LITTLE HOUSES card
Materials list:
Cardstock – The Chocolate Box/Core’dinations
Patterned paper – Ellie’s Day Out/Nikki Sivils Scrapbooker
Stamps – Victoria’s Secret/Nikki Sivils Scrapbooker

3D Foam squares – Scrapbook Adhesives by 3L
Cuttlebug Swiss Dot embossing folder
Martha Stewart border punch
Sandpaper
White stamp pad – Joann Craft store
White embossing powder – Stamp n’ Stuff
Ribbon
Machine sewing


LOVE YOU GRANDMA card
Materials list:
Cardstock – Core Essentials/Core’dinations
Patterned paper – We R Memory Keepers and My Mind’s Eye

Rub-on flowers – Creative Imaginations
Scallop circle punch – Marvy
Border punch – Martha Stewart
Mini brads – White Tulip 3-D Fashion paint
3D Foam squares – Scrapbook Adhesives by 3L
Mini sticker letters - Sticko
Sandpaper

Wednesday, March 31, 2010

It is a Flower Soft day

I love challenges and today the Flower Soft team has a challenge to show you some more goodness using Flower Soft.
I combined the new Recipe Card Toppers from Flower Soft with a couple colors of Flower Soft. The recipe card toppers come printed and pre-colored. What this means for you is that they are ready to be used on a card or other project "as is". They are cute and come in a variety of themes. I wanted to make a cute card for Dad and I love the color combination.
I used Delphinium Blue Flower Soft for the border and Toffee Ultra Fine Flower Soft for the edge of the little rug.
Remember one huge tip: Use Aleene's Tacky Glue when trying to add the Flower Soft to your project. There are all kinds of glues and they sort of work but with experimenting the Flower Soft folks found the Tacky Glue to do the best job of gripping the most little fibers. Be generous when you apply the glue, it will dry clear and a generous amount will grab more of the Flower Soft little pieces.
Be sure to visit all of the team members blogs to see additional goodness using Flower Soft.
***
Gotta share a photo from our yard this last weekend! We have these Calla Lilies and what is weird is that they practically grow like weeds! They take no care at all and they just keep coming. They are so gorgeous.
Thanks for visiting, Linda (lbpost)
RECIPE FOR A DAD card
Materials list:
Cardstock – Core Impressions/Core’dinations
Patterned paper – My Mind’s Eye
Pre-colored Recipe card topper – Flower Soft
Ultra Fine Flower Soft
Flower Soft
3D Foam squares – Scrapbook Adhesives by 3L
Tacky Glue – Aleene’s®
Powder puff chalk stamp pad – Quick Quotes
Sandpaper