Showing posts with label The Cat's Pajamas. Show all posts

Saturday, February 18, 2012

Moxie Fab and Unscripted sketches

I have a couple cards to share with you today.

First off, this amazing Tuesday Trigger at Moxie Fab. 


This is a bit on the artsy side and I love working with that style although I don't very often.  It just seemed this Trigger piece required it. 
When I cut out the flourish image, I made sure to leave white cardstock showing to go along with the black and white in the one element in the Trigger.  Of course, the turquoise in the doily that is a die from My Favorite Things matches part of the headboard.  The great pink patterned paper by Recollections goes along with the pillows.

Notice my background design? I used an orange cardstock for my card and I knew I needed some kind of a design on the card but it could not be overpowering. I used a stencil and sponged it with a Chalk stamp pad by Clearsnap.

Now to share my Unscripted sketch card for this week. There is a piggyback challenge this week to add sewing to the card.

I used a Hero Arts cloud background stamp and then this super cute bunny in an airplane stamp by The Cat's Pajamas for the main elements on my card.


The cloud die is also by The Cat's Pajamas and I did a line of machine sewing through it.
I also have a photo to share...

My first daffodil bloomed in my yard this week!

Thanks for visiting, Linda (lbpost)

Saturday, October 8, 2011

A Yippee Skippee Day

 Do you know what this little banner means!? I get to be part of the Paper Smooches Sparks Challenge Design Team for the next few months. You might have already gathered that I love challenges and that is just what a "SPARK" is, a piece of inspiration that should spark a creative idea. 
 This is the newest Paper Smooches Spark challenge and of course, I wanted to play along. 
 I thought the way the little images were scattered on the page, it looked like leaves falling.  I used the newest FREE digital images at Paper Smooches.  One thing that is cool about a digital image is that you can print it out in pretty much any size.  All I did was open a Microsoft Word document and inserted the leaves, one by one.  I resized the leaf a few times and printed them on plain white cardstock and a piece of red patterned paper and a piece of  yellow patterned paper.  For the white cardstock I used the x-Press Copic Marker paper.  Not only does this paper would amazingly well with the Copic markers for coloring and blending but the computer prints wonderfully on it. 
 I printed the digital sentiment directly on the white cardstock.  The leaves were cut out and then placed on the white cardstock that I had sprayed a couple colors of the Smooch Spritz by Clearsnap.  The white leaves were colored with Copic markers. 
 Another reason for a happy post is that The Cat's Pajamas stamps was the sponsor this last week at Card Positioning Systems blog.  Is this guy the cutest?
After I colored the stamped image, I sprayed the entire piece with a Smooch Spritz in a shiny silver color. It really made a nice finish to the image. 
And for a couple photos...

We got a huge downpour of rain this last week and the sky the day after was nothing but big, fluffy clouds.  I had to take photos, of course.  I used my Hipstamatic app on my phone.

And, this beauty is in my garden. I so love fuchias.
Thanks for visiting, Linda (lbpost)

Saturday, June 19, 2010

Sneak peek of my Flower Soft day

It is Saturday and so it, again, is my day to post over at the Flower Soft blog. I wanted to give you a little peek at my project for today.
This is a side view so you can see the dimension that the Flower Soft adds to a project. Of course, there are a few pics in my post at Flower Soft and I also gave some details of the finished project.
Thanks for visiting here and there, Linda (lbpost)

DO I SMELL CAKE? card
Materials list:
Flower Soft – Polar White, Sweet Pea and Sunshine Yellow
Tacky Glue – Flower Soft/Aleene’s
Cardstock – Core Expressions/Core’dinations
Patterned paper – Chic Bebe Girl: Notes Paper/Teresa Collins Designs
Stamps – The Cat’s Pajamas
Copic markers

Sandpaper
Self adhesive rhinestones – Queen & Co.
Foam tape – 3M
Black Versafine stamp pad
Clear embossing powder – Stampendous
Glitter 3-D Fashion Paint - Tulip

Monday, November 23, 2009

Set that Thanksgiving Day table and pull out the pumpkins

This week is all about the Thanksgiving Day meal, whatever it is you traditionally eat and we are still thinking about Pumpkins and Fall leaves so all of that goodness is part of my post today.
First up, super quick and easy and adorable placecards for the table. This image is from a set of Clear stamps by The Cat's Pajamas and when I saw it I just knew that that area in the tablecloth was perfect for the guest's names.
All I did was stamp the image with black ink and I embossed it with clear embossing powder only because that makes the black lines more intense. I added a very small amount of color with Copic markers but that wouldn't even be needed if you need the project to be quicker. I cut that piece out and then added it to a little folded piece of this wonderful patterned paper with foam tape for added dimension.
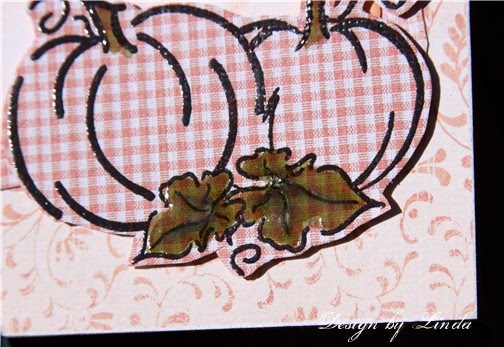
Next comes some pretty cute pumpkins on my CPS card for this week. The sponsor is DRS designs and I used this neat verse and outline pumpkins.
Since the pumpkins are an outline, I could stamp them on this patterned paper to give a little bit of a different look and then I also didn't have to color them in.

I did add some color to the leaves and then I coated them with the Aleene's Paper Glaze for an epoxy look.
******
And, I just have to share a couple more photos!
This is an amazing tree that was in a park in Medford, OR.
And this is a tree that was on a street that we drove down in Medford and I just had to stop and get out and take photos.
Thanks for visiting, Linda (lbpost)
THANKSGIVING PLACECARDS
Materials: Cardstock – Curious Iridescent Cryogen White/CutCardStock.com
Patterned paper – The Spider’s Web/My Mind’s Eye
Clear stamps – The Cat’s Pajamas
Copic markers
Versamark black stamp pad
Clear embossing powder
Corner rounder punch – Fiskars
Foam tape – 3M
SKETCH 143 – PUMPKINS… card
Materials:
Cardstock – Cryogen Curious Iridescent/CutCardStock.com and Core Essentials/Core’dinations
Clear stamps – Courtesy of DRS stamps
Patterned paper – Wild Asparagus and Tres Jolie/My Mind’s Eye and Farmer’s Market/The Shabby Door
Loopy Border punch – Martha Stewart
Black Versafine stamp pad
Chalk stamp pads - Clearsnap
Clear embossing powder
Copic markers
Clear Paper Glaze – Aleene’s®
Sandpaper

Wednesday, November 4, 2009

The colors of fall

There are two parts to this post for today. The first is this totally cute Turkey Kitty stamp from The Cat's Pajamas new Swanky Clear set, Gobble It Up!
I used the 2 Sketches 4 You sketch #38 for this week to create my card.
Take note of the little orange strip going down the side of the card. I used a piece of Core'dinations and I created a texture on it with a Fiskars Paper Crimper. One swipe through the crimper and my paper has a great wave design and then I sanded that to help it show up better.
I used Copic markers to color the little feathers on the back of the kitty cat that I stamped with black ink and embossed with clear embossing powder.
I took a photo with the sun shining on the feathers so you could see the results of coating them with Aleene's Paper Glaze. LOVE the epoxy look this liquid gives an image.
******
Second part to my post - I want to share some photos from our recent trip up into Oregon. I'll need to take several posts to share just a glimpse of the tons of photos I took but I will start with a few from Multnomah Falls. If you have never stopped at this attraction you HAVE too and if you can pick the fall for that visit, then all the better. We have stopped here several times but this time with the fall colors was just plain breathtaking. Add a light fall of rain to make the colors more intense.


Thanks for visiting, Linda (lbpost)
TURKEY KITTY CAT card
Materials:
Cardstock – Core’dinations
Patterned papers – Fetching/Pink Paislee
Swanky Clear stamp – Gobble It Up/The Cat’s Pajamas
Corner rounder punch – PaperShapers/EK Success
Copic markersClear Paper Glaze – Aleene’s®
Fiskars Crimper
Ribbon
Button
Sandpaper
3M foam tape


Monday, September 28, 2009

The Cat's Pajamas Blog Hop

It's a blog hop and I get to play!!! The Cat's Pajamas is releasing a new, clear stamp set called FRIGHT NIGHT and all of the participates in the blog hop will be using this set. (I get to play because I was a past Swanky Stamper winner)
Today's Haunted Hop includes a PRIZE giveaway!! Here's how you can win: You must leave a comment on each blog in the hop, for your chance to win this month's KITTY KAT PACK!! The Kitty Kat Pack will include:The Fright Night set, Hocus Pocus Buttons, Hocus Pocus Glitter Pack (like THIS one but spookier).
Alma will be choosing a random commenter and posting it to HER BLOG sometime on Friday, October 2nd. All of the details of this blog hop and the TCP challenge are at Susan's blog.
You possibly came to my blog from Tracy's blog. After you have looked over my creations, hop on over to Amy's blog.
I used the Card Patterns Sketch#33 from last week for my design. I love to use sketches, but maybe you know that already. I purchased these Halloween themed papers last year and I instantly knew I wanted to pull them out.
If you take a look at the Fright Night set of stamps, you will see that this great tree has a face in it. I wanted to use the adorable little owl on my tree and thought the face would be distracting so after I stamped the tree with the black ink and embossed it with clear embossing powder, I took a black, permanent pen and colored in the face parts. I quickly poured clear embossing powder on the ink and it was just wet enough to hold the powder.
Notice too that the black card is from the Black Magic collection by Core'dinations. I embossed part of it with a Cuttlebug embossing plate and then sanded the embossed area and the edges of the card to expose the core of the paper.
What would Halloween be without CANDY! And what would be even better then a little gift of candy to have for party favors or as a gift to co-workers. etc. I used an origami technique to create a little box from my patterned paper and two little candy bars just fit inside.
The candy bars are wrapped with black paper and tied with a black bow.
Another stamp in this Fright Night set is the little collection of Halloween candies. I took a piece of cardstock and stamped this little set a number of times to create my own patterned paper. I quickly colored the pieces in with Copic markers. I then sprayed my piece with a couple colors of Memories Mist spray. Next I used my tag punch and just punched out the tags to tie to my candy bars.
Remember, it's off to Amy's blog now.


Thanks for visiting, Linda (lbpost)

HAPPY HALLOWEEN card
Materials:Cardstock – Curious Iridescent Cryogen White/CutCardStock.com and Black Magic/Core’dinations
Patterned paper – Haunted:Ominous/Cosmo Cricket
Stamps – Fright Night/The Cat’s Pajamas
Versafine black stamp pad
Clear embossing powder
Copic markers
Cuttlebug embossing plate – Provo Craft
Corner rounder punch - Fiskars
Scallop circle punch – PaperShapers
Memories Mist spray – Stewart Superior
Foam tape – 3M

CANDY TREAT card
Materials:Cardstock – Curious Iridescent Cryogen White/CutCardStock.com
Patterned paper – Haunted:Ominous/Cosmo Cricket and BasicGrey
Stamps – Fright Night/The Cat’s Pajamas
Versafine black stamp pad
Clear embossing powder
Copic markers
Tag punch – McGill
Ribbon

Saturday, August 22, 2009

The Cat's Pajamas color inspiration

I don't know what I enjoy better, a great sketch challenge or a color inspiration challenge! I found this cute inspiration piece at The Cat's Pajamas this week and since I love challenges, I knew I needed to give it a try. Plus I could pull out some brand new TCP's stamps!
I followed the color part of this challenge since I really didn't have stamps that were back to school themed. I found this piece of Cosmo Cricket paper in my stash and it was such a perfect fit, I knew I had to create!
This chicken sitting in the soup bowl is just too much and wouldn't it be the kind of creation that would bring a smile to the face of someone who wasn't feeling well?
I colored the chicken and the bowl with my copic markers and then I tried to get the sun to shine on the bowl a bit so you can see that I gave the bowl a coat of Aleene's Paper Glaze. This gives a great epoxy look so it looks just like a shiny bowl you would pull out of your cupboard.
****
I wanted to share a photo of the three silly boys that were at my house today. They were asking for me to take pics of them but it is funny how the silly faces always have to be part of that!!! They were actually pretty tame in this photo, it can be sillier!
Thanks for visiting, Linda (lbpost)
BETTER GET BETTER card
Materials: Cardstock – Vintage collection/Core’dinations
Patterned paper – Cosmo Cricket
Swanky Clear stamps – The Cat’s Pajamas
Copic markers
Loopy border punch – Martha Stewart
Versafine black stamp pad
Clear embossing powder
Clear Paper Glaze – Aleene’s®
Sandpaper

Friday, May 22, 2009

The Cat's Pajamas and the Tortoise

You already know I love sketches so I wanted to make sure I played along with the challenge for this week at The Cat's Pajamas. I love their stamps so this also gives me a great reason to pull them out again.
An interesting feature of this card is that these wonderful papers by Scenic Route are meant for summer/4th of July but I figured I could make them fit a winter theme. I combined these Core'dinations cardstocks to go along with the red and blue in the patterns. Notice the sanded edges of the cardstock that really brings out the core of the papers and adds a fun accent.
Now to a photo that I wanted to share.
We have had a desert tortoise for something like 30 years. He just comes and goes in the backyard at his leisure. This week, our youngest grandson and the tortoise met. How cute is this? Our grandson kept taking the lettuce away from the tortoise but believe me, the tortoise was not going to put up with that at all!

Thanks for visiting, Linda (lbpost)


BRRRRRR! card
Materials:
Cardstock –Vintage Collection/Calypso and Core Essentials/Cardinal/Core’dinations
Patterned paper – Liberty/Scenic Route Papers
Clear Swanky Stamps – The Cat’s Pajamas
Copic Markers and Blender pen
Black Versamark and Blue Ancient page stamp pads
Detail Clear embossing powder – Stamp n Stuff
Apron Lace border punch - Fiskars
Scallop circle and circle punches – Marvy
Snowflake punch – Papershapers/EK Success
Memories Mist spray

Wednesday, April 29, 2009

Card Patterns and The Cat's Pajamas Inspriation Challenge

I went searching for some fun challenges this week and ended up at two places, Card Patterns and The Cat's Pajamas. I recently found out that The Cat's Pajamas issues a new challenge each Tuesday and this week it is an inspiration challenge.
This first card is Card Patterns sketch #12 for this week. Their sponsor is Unity stamps so I pulled out this set I just love. The sketch really has what look like three circle kind of designs on the front, but what I like about sketches is that you are to look at them and make them your own so I used the stamps and created three points of interest on the front.
The two little stamped birds are one of the points, the Give Thanks label piece is the second and the flower is the third.
1. The birds are stamped and embossed and colored with Copic markers and accented with Diamond Glitter 3-D Fashion paint on portion of the birds. One of the birds is added to the card with foam tape so their is dimension to them.
2. The label piece is also stamped and embossed and then the greeting is stamped over that and that is also embossed. I used Copic Markers to add a little bit of color to the border and added the same Diamond Glitter 3-D Fashion paint by Tulip to the colored border. I love the little bit of glitter that this adds while still letting the colors show through.
3. The flower was really white, I sprayed it with Memories Mist by Stewart Superior. This makes such a quick and easy way to add color.
Recently I was able to play with some The Cat's Pajamas stamps if you remember that post and I wanted to pull those out again. I was over taking a look at their blog and web site and I discovered that they issue a challenge each Tues. This week the team member, Toni, picked out a great set of summer themed glasses for inspiration and I picked out the great summer colors of the prints on the glasses for my card. I just love how these Prism papers have the exact perfect shades to go with this wonderful We R Memory Keepers paper that has the exact colors in the stripes.

This cute kitty cat was simply stamped with the black ink and embossed with the Detail Clear embossing powder. I just love how intense that makes the image and really brings it to life. I gave a little shadow around the image with a Copic Marker and the blender pen and then added the Diamond Glitter 3-D Fashion Paint by Tulip to the wings and the halo. Again, I just love the amount of glitter you get with this kind of paint. Just makes that little cutie look so angelic.
Thanks for visiting, Linda (lbpost)


GIVE THANKS FOR BLESSING… card
Materials:
Cardstock
Patterned papers – Providence/Cottage Street/Scenic Route Paper and Dazzling Dots/29th Street Market/My Mind’s Eye
Apron Lace border punch – Fiskars
Set of stamps – Unity
Versafine black stamp pad
Clear embossing powder
Copic Markers
Diamond Glitter 3-D Fashion paint – Tulip
Flower – Petaloo
Memories Mist spray – Stewart Superior


SWEETIE PIE card
Materials:
Cardstock – Prism
Stamps – The Cat’s Pajamas
Patterned paper – We R Memory Keepers
Black Stamp pad – Versafine
Detail Clear embossing powder – Stamps n Stuff
Circle punch – Papershapers/EK Success
Scallop oval punch - Marvy
Oval punch - McGill
Mini brads – Making Memories
Ribbon
Diamond Glitter 3-D Fashion paint – Tulip
Copic Markersc

Thursday, April 16, 2009

More The Cat's Pajamas goodness

Once I had these cute The Cat's Pajamas stamps in my hand, I guess I just couldn't stop creating! These things are so cute and you know what is almost the cutest part are the adorable sayings with each set!!!
I did the above card to go with the CPS sketch for this week. I had already created one but I could see this little rocket ship fitting the sketch so perfectly.
It was fun to use star accents on the side piece and the rocket is colored with Copic Markers. There are tiny drops of Aleene's Paper Glaze on the bigger hearts and on the heart on the rocket ship. Just adds for some fun dimension and makes the red more intense.
I have to laugh at the above card because those papers are actually from a Christmas collection but don't they just look like a party ready to happen?
The dog and the greeting are both stamped on the White Cryogen Curious Iridescent paper by CutCardStock.com and both are embossed with clear embossing powder. With all of the black on the doggie, this just makes that black more intense. Can you see the slight shading around the one side of the dog with the Copic Markers. Since the Copic Markers work with a blender pen, it is easy to get a subtle look like this. The cake is also colored with the Copic Markers and the little heart on the top has a tiny dot of the Aleene's Paper Glaze again. That just gives the heart a little added emphasis that is fun.
For this last card, who doesn't love cupcakes and so I just had to use them. I used two sizes of a Nestabilities label die by Spellbinders. That is just an easy way to create a fun accent and it helped to give a great emphasis to these tiny cupcakes.
The frosting on the cakes is filled in with Diamond Glitter 3-D Fashion paint by Tulip and the papers on the cupcakes and the top accents are both filled in with Aleene's Paper Glaze . These both just add some extra fun to the look. For the labels I did use the cutting step and then the embossing step and a tiny bit of added color was sprayed on with the Memories Mists spray.
A couple added accents would be that I embossed the front of the card with a Cuttlebug embossing plate. I used Core'dinations cardstock for the card and so I tore the one edge because that is one of the qualities about this paper that is so nice. And since the front of the card was shorter then the back of the card, I glued a thin strip of the patterned paper to the back edge so that when the card is closed that patterned edge is exposed.
Thanks for visiting, Linda (lbpost)
SKETCH 111-b – YOU SEND ME card
Materials:
Cardstock – Cryogen White Curious Iridescent/CutCardStock.Com
Stamps courtesy of The Cat’s Pajamas – Clearly Swanky
Patterned paper – Woolworths/Hometown/October Afternoon
Versafine Black stamp pad
Clear Detail embossing powder – Stamps & Stuff
Copic Markers
Star punch
Clear Paper Glaze – Aleene’s®
Ancient Page and Fluid Chalk stamp pads – Clearsnap
Mini brads
DOES THAT MEAN YOU’RE A GROWNUP NOW card
Materials:
Cardstock – Cryogen White Curious Iridescent/CutCardStock.com and Prism
Patterned paper – Christmas/Ivy/We R Memory Keepers
Stamps – The Cat’s Pajamas
Versafine black stamp pad and Clear embossing powder
Circle and scallop circle punches - MarvyClear Paper Glaze – Aleene’s®
Copic Markers
Ribbon
DO I SMELL CAKE? card
Materials:
Cardstock – Core’dinations
Patterned paper – October Afternoon
Stamps – The Cat’s Pajamas
Versafine black stamp pad and Clear embossing powder
Self adhesive rhinestones – Mark Richards, Inc
Label dies – Nestabilities/Spellbinders
Memories Mists spray – Stewart Superior
Cuttlebug embossing plate – Provo Craft
Diamond Glitter 3-D Fashion Paint - Tulip
Aleene's Paper Glaze