Friday, April 29, 2011

School Buses and a Promotion

Most often when I start working with a new sketch, I feel a bit of a challenge in how I will interpret it, but it doesn't take too long for a card to start forming. 

The same goes for this weeks Unscripted sketch. It started out as a challenge and I ended up loving it.

 I did turn the sketch on it's side, but that is what sketches are for! They are to be a launching pad. 
 The sketch shows three different shaped pieces on the side and so I picked out a few punch out die cuts from a sheet by Crate paper to create a little collage.  Is that school bus too cute?!
 Did you notice my little circle accent peeking out from underneath the other pieces? I used my Kreaxions circle cutter to cut two circles. I have never been a fan of circle cutters but I have to shout it from the rooftops how much I love this one! It is SOOOO compact and so easy and fast to use.  I have lots of circle punches and there always still seems to be a size missing and no more, with this cutter, there are an infinite number of sizes that can be cut.  I only have a small cutting pad that I use because you turn the paper so you don't need a whole lot of room. 
Gotta share some PROUD moment photos...
 Our son had his ceremony to celebrate his promotion to Fire Captain! He asked his dad to pin on his new badge. 
Here is an offical pose with his new helmet, etc. 

Thanks for visiting, Linda (lbpost)

SKETCH 104 – YOU ARE A GEM card

Materials list:
Cardstock – Core Expressions/Core’dinations
Patterned papers – SchoolHouse/October Afternoon
Punch out die cuts – Crate Paper
Circle cutter - Kreaxions
Self adhesive rhinestones – Recollections
Rub-on sentiment – EAD Designs/Paper Smooches
Corner rounder punch – Fiskars
Divine Twine
Sand It Gadget – Core’dinations

Tuesday, April 26, 2011

Butterflies, Buttons and Easter Eggs

First off, I want to share my Card Positioning Systems sketch card for this week, this is where the butterflies come in. 
What made this card particularily fun was mixing these Cosmo Cricket papers and stickers together. 
Notice I gave both of the butterflies on the patterned papers a coat of Aleene's Paper Glaze. It gave them just the right amount of added accent. 
Do you love those corners!!! I used a Martha Stewart order punch to make my card fit the CPS sketch.
I also want to share a super quick and easy card. All I did was pull out some of my new Echo Park papers and stickers.  The row of buttons are a sticker!
And for some Easter photos...
This is how he was dressed for church on Easter morning.  We did a little photo shoot when we returned home.
Yes, you are seeing this correctly! A dressy shirt, tie and vest and DIRT!!! We could hardly keep him out of it while we finished taking pics!
Now for the annual egg hunt.  We hide plastic eggs all over the yard and they have MONEY in them! Yes, they are both going for the same egg but actually the shorter one spied the egg on the banch of the tree and the taller one is helping reach it!
This was his first year to really get the "hunting" part of the day.  Everything in his life right now is about dinosaurs, thus the cute shirt!
Thanks for visiting, Linda (lbpost)

SKETCH 215 – ONCE UPON A TIME card

Materials:
Cardstock –Core Essentials/Core’dinations
Patterned papers and stickers – Togetherness Collection/Cosmo Cricket
Corner punch – Martha Stewart
Clear Paper Glaze – Aleene’s®
Machine sewing
Sand It Gadget – Core’dinations

HONK! HONK!

Materials:
Cardstock – Core Impressions/Core’dinations
Patterned paper and die cut stickers – Sailboats/Echo Park
Divine Twine
Sanding block – Core’dinations

Friday, April 22, 2011

More stamping - JustRite Stamps and Layers of Color Stamps

For my post today, I want to cover my Unscripted sketch card for this week and the card I created for my day on the Just Imagine Crafts/Kreaxions blog and both include stamping. 
Here is the Unscripted sketch for this week. 

First off, some JustRite stamps to help me create my Unscripted sketch card.  I have a fondness for "sea" related images and this set from JustRite fits the bill very nicely.  I paired it with some great American Crafts patterned papers. 
The shells were stamped on white cardstock and then colored very simply with Copic markers.  Next I cut this out with one of my Spellbinder Nestabilities. While the Nestabilities die was still in place, I used a blender sponge to add a soft coat of ink with a Distress stamp pad.  I accented some of the shells with Glitter 3-D Fashion paint by Tulip because it always seems that sand has a bit of glitter/gleam to it.  Notice the cream colored wood grain cardstock, that is Core Impressions by Core'dinations. 
Next, I want to share the card that I created for my day to post on the Just Imagine Crafts/Kreaxions blog.  Here is where the Layers of Color stamps come in since I had just received this set from them with that wonderful butterfly in it. I stamped the butterfly on a vellum kind of paper with black ink and embossed it with clear embossing powder.  I then sponged on brown Distress ink.  The tiny flower is one flower cut from a ribbon by Maya Road with a pearl in the middle of it.
For my Kreaxions project, I used their star template and cut out white cardstock using it.  Next, I used a 922 Fountain 4-in-1 punch to punch each of the points on the star shape and the result is this wonderful, lacey doily look.  I cut the brown patterned paper with a Kreaxions circle cutter. I have never been a fan of circle cutters until I tried this one. WOW is it easy to use and very handy to have on my scrapping table. 
Now for some photos...
Our adorable puppy is one year old this week.  Here she is when she came to our home at about 3 months. 
Here she is today! Isn't she just tooooo cute!
Here she is with one of her favorite toys. We have to find the most sturdy ones because she can distroy most things she gets ahold of in a few minutes!!! We love her, though.
Thanks for visiting, Linda (lbpost)

SKETCH 103 – BY THE SEA card

Materials list:
Cardstock – Core Impressions/Core’dinations
Stamps – By the Sea set/JustRite stamps
Black Versafine stamp pad
Distress stamp pad - Ranger
Clear embossing powder – Stampendous
Copic markers
Spellbinder Nestabilities die
Circle cutter - Kreaxions
Patterned paper – Campy Trails/American Crafts
Self adhesive rhinestones – Recollections
Mini sticker letters – Cosmo Cricket
Corner rounder punch – Fiskars
Glitter 3-D Fashion paint - Tulip
Foam Tape – 3M
Sand It Gadget – Core’dinations

MERCI card

Materials list:
Cardstock – Core Essentials/Core’dinations
Patterned paper – The Merry Days of Christmas/My Mind’s Eye
Butterfly Stamp – Layers of Color
Black Versafine stamp pad
Clear embossing powder – Stampendous
Distress stamp pads
4-in-1 punch – 922 Fountain/Kreaxions
Circle cutter – Kreaxions
Rub-on sentiment – EAD Designs/Paper Smooches
Self adhesive pearl – Recollections
Ribbon flower – Maya Road
Foam tape – 3M
Sand It Gadget - Core'dinations

Tuesday, April 19, 2011

Gina K and JustRite stamps

I love to stamp, I love to buy stamps, I love to collect stamps!!!!  If that sounds like an addiction, then that is me!
I used this adorable set of postage related stamps by Tami Mayberry for Gina K stamps.  I used them along with the Card Positioning Systems sketch for this week. Tami is the sponsor this week and you really need to check in on Wednesday to see what she is giving away. 
The green background postage stamp was created with some of the stamps from this set. 
For my next card, I pulled out some brand-new-to-me stamps from JustRite stamps.  I created it around a challenge that they are having on their blog this week and that is to make a handmade flower.  Plus, the flower fits the Moxie Fab Tuesday Trigger for this week with the crepe flowers although the trigger is a whole lot more subtle in the colors.
I stamped the frame on white cardstock, added some color to portions of it with Copic markers and then sprayed it with Rolling in the Hay, Shimmerz Vibez. 
For my flower, I pulled out some orange tissue paper that came in a package that I purchased. I had actually already thrown this paper in my garbage can.  I guess this fits Earth Day and recycling too!!! I looked down and saw that even though I had torn this paper, I had enough of it to cut some circles.  I folded it and roughly cut four layers of circles.  Next I took some large scallop scissors and tried to cut around the edge.  After I had these layers glued to my card and after I glued the buttons in the middle, I scrunched and crunched the layers. 
And I have to share a couple photos...
Our youngest grandson just turned 3 years old.  His party is still to come but he wants a Dinosaur party so I had this huge Dinosaur balloon waiting for him when he came home on his actual birthday.  He was sooooo impressed!!!
This thing is almost as tall as he is!!!
Thanks for visiting, Linda (lbpost)

SKETCH 214 – THINKING OF YOU TODAY card

Materials:
tamps – Special Delivery set/Tami Mayberry/Gina K
Cardstock –Core Essentials and Core Impressions/Core’dinations
Patterned paper – October Afternoon
Black Versafine stamp pad
Clear embossing powder – Stampendous
Memento stamp pads
Border punch – Martha Stewart
Circle punches – Marvy
Sand It Gadget – Core’dinations
Foam tape – 3M

BEST FRIENDS FOREVER card

Materials list:
Cardstock – Vintage/Core’dinations
Patterned paper – My Mind’s Eye
Tissue paper
Stamps – Vintage Oval labels/JustRite Stamps
Black Versafine stamp pad
Clear embossing powder - Stampendous
Circle punch
Buttons
Sand It Gadget - Core'dinations

Saturday, April 16, 2011

Recyling and crafting

I could hardly wait to share this weeks card with you. I used the Unscripted sketch and the Piggyback challenge to go along with the sketch is to use recycled material to go with Earth Day.  At first I thought this was going to be a bit of a challenge until I got started!!!  Wow was this fun.
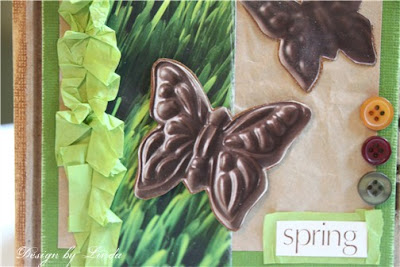
I got started with my inspiration point when a Godiva Chocolate catalog arrived in the mail and what was on one of the pages but these great chocolate butterflies and some grass print pages.  Since I am always a fan of butterflies on a card, I knew I had to put these beauties to good use. 
The word "spring" was cut from the same catalog.  The brown, crinkled paper is from a paper bag that I got while shopping. The buttons are ones that I save when they come with new clothes that I buy. I have a ton of these things!!!
Even my card base was recycled because I took a part a card I had created that I didn't really care for and there was just the right color and size for my card.  See the corrugated cardboard? That is from a box and the green tissue paper came with a scrapbook order from Emma's Paperie because she always wraps the products so cute and I save the tissue paper. 
Thanks for visiting, Linda (lbpost)

SKETCH 102 – SPRING card

Materials list:
Cardstock – Core Expressions/Core’dinations
Images and papers from Godiva catalog and a paper bag
Cardstock from packaging
Buttons from clothes
Tissue paper from a package
Foam Tape – 3M
Sand It Gadget – Core’dinations

Thursday, April 14, 2011

My Core'dinations Creative Frenzy

For awhile now, I have had the amazing opportunity to work with Core'dinations Cardstocks.  I  am pretty sure there isn't a project that I work on that doesn't include it in some way.

I love the texture, I love the colors, all of the Core Impressions designs that have embossed designs on them already that they have released are wonderful and so fun to work with but my favorite part is what happens when you emboss this paper. The core that is revealed when you sand the paper makes for a great look and all of the embossing folders that have been introduced by a variety of companies make this technique even more fun.  SOOOOOO...are you ready for my entry as I reapply for the team!?

For my first layout, I discovered this amazing piece of Sable Core Amour that somehow I missed before! It just seemed that it needed to be paired with a beach photo and theme. 
I hand wrote the word "beach" and then cut it out for my title. 
My little sun accent was created with a punched circle and hand cut rays that were cut from a larger circle. 
For my pleated border, I took a piece of Cosmo Cricket Neutrals Core Impressions that has a notebook kind of embossed design it in . I cut a strip and then hand folded it on some of the lines that are embossed in it. It was so easy and I love the 3-D look of it. 
This layout highlights a couple of the very newest cardstocks by Core'dinations. The pink piece is from the Teresa Collins collection and then I used a piece of silver Glitter Silk. Wow is this combination "girly"!!!  I had just picked up some pieces of Teresa Collins patterned papers so I used them for accents. 
The flowers were cut out of one of the patterned papers. And, the photos are actually ME!!!
Can you see that great embossed pattern in the Core'dinations Core Impressions and I wanted to also try to show you the wonderful glitter of the silver piece. 
Next, a card using four colors from the Cosmo Cricket Core Impressions collection. 
This collection comes with that great embossed design in it already, all I did was sand it a little bit. And, when it comes to sanding, you HAVE to get the new Sand It Gadget! I have never found anything that sands like this thing. I use it on all of my Core but on every other kind of paper that I sand too.
I pleated a strip of patterned paper for an accent and the sentiment is a rub-on by EAD Designs and Paper Smooches, Martha Stewart border punches. 
One last card, here I wanted to show how great these cardstocks look when you used embossing folders.  I used three different ones by Cuttlebug and Sizzix.  I used Card Patterns for my inspiration.
The labels are cut with a Spellbinders Nestabilities and the sentiment is a sticker by SRM stickers. 

Thanks for visiting and looking around, Linda (lbpost)

Wednesday, April 13, 2011

Flower Soft Die Cut Dimensions Blog Hop

We invite you to join the fabulous Flower Soft® team on an inspirational blog hop featuring projects using Die Cut Dimensions - Wild Flowers and The Wine Buffs - Papercraft Kit!

The blog hop starts on the Flower Soft® Blog on April 13th at 6:00am CT and ends April 19th at midnight CT. The winner will be announced on the Flower Soft® Blog on April 20th.
If you get lost along the way the complete hop list will be posted on the Flower Soft® Blog.

Be sure to comment on every blog in the hop. One lucky person that comments on one of the blogs will be chosen to receive a $50 Flower Soft® shopping spree!!!


Here is my card. I used one of the pieces from the Wild Flower Die Cut Dimensions set.  I LOVE these red flowers.  Each set comes with several flower pieces to use and they are ready to punch out making it very quick and easy to create something pretty.  I added some of the daisies in the same set to give my card a mix of flowers. 
The perfect compliment to daisies would be some Citrus Crush Ultra Fine Flower Soft for the flower middles.  Remember the Flower Soft works best with the Aleene's Tacky Glue
From my blog, hop on over to Vickie's blog to continue the hop and to see more goodness.
Thanks for visiting, Linda (lbpost)

YOU ARE A BLESSING card

Materials list:
Cardstock – Jenni Bowlin Core Impressions/Core’dinations
Citrus Crush Ultra Fine Flower Soft
Tacky Glue
Die Cut Dimensions – Wild Flowers
Stamp pads – Memento
Rub-on sentiment – EAD Designs/Paper Smooches
Damask stamp – Judi Kins
Sand It Gadget - Core'dinations

Monday, April 11, 2011

Sketchy Thursday challenge

I love to find challenges and sketches on the net and so when I went looking yesterday, I came across this Sketchy Thursday sketch and I just knew what I wanted to do with it. 
Here is the sketch, I turned it on it's side to make it fit my photos better.
I created a little collage of four photos from one of the days we went to watch our grandson play basketball.  Picassa makes this so easy and it even lets you add the borders, etc. 
When I saw those partial circle designs on the sketch, it made me think of a ball and in this case a basketball.  I loved the argyle design in the paper they showed in the sketch and I thought of how I could create a design with my cardstock.  I used a piece of Core Essentials and Core Vintage Core'dinations cardstock.  I embossed pieces of both papers using my Cuttlebug and an embossing plate. I always think this one look masculine.  I cut the two embossed papers in 2" circles and glued them to a piece of black cardstock.  When I had the pieces all in place, I used my Kreaxions circle cutter to cut out half of a larger circle and a smaller circle.  Let me tell you, that circle cutter is a MUST HAVE!!!! So easy to use. 
That black background cardstock is new from Core'dinations and I liked the little circles that were embossed in it.  Remember all you need to do with Core'dinations cardstock is sand them a bit and you get such a neat look to the embossed pieces.
For a couple photos...
We went to visit Thomas the Train this last weekend in Fillmore, CA.  There was so much anticipation to this day by one little guy!!! We did take a ride, it is so fun. 
Before and after the ride though, this was about all he wanted to do. They have several tables set up with tracks and bridges and tunnels, etc and he could have stayed here all day long!

Thanks for visiting, Linda (lbpost)

DRIBBLE layout
Core'dinations Core Essentials, Core Impressions and Core Vintage
Picassa for the photo collage
Jenni Bowlin letter stickers
Kreaxions Circle Cutter
Cuttlebug Embossing Plate
Sand It Gadget - Core'dinations