 #1. I love to use these Kaleidocolor stamp pads with the brayer. The reason is that they are multi-colored and these particular pads have some rather clever features that make them long lasting and easy to use. This photo above is the pad as it looks when you remove the lid. The colors are stored "separate". In the past, multi-colored pads were just one pad with different colors on them and it wasn't long and the colors would just run together, making for a rather muddy look. These pads have a lever that separates the colors, you can't put the lid back on without pulling the lever to separate them.
 #2. When you go to use the pad, you push the lever and the colors are pushed together to form one solid pad. In the photo above, you can see the pad with the colors pushed together and you can see how I have placed my brayer on the pad. You want to ALWAYS place the brayer back in the same direction on the pad. So, the end that started on the green end, always needs to be placed back on the green end. If you reverse the brayer or a stamp you are using, you will transfer the colors onto each other and that doesn't work well. If you do that (I am speaking from experience here) you can take a cloth and just wipe the pad and alot of that transfered color will be removed.
 #3. I like to completely cover the brayer with colors by running it over the pad several times and then I use a small, misting bottle and spray the brayer. You can see by the above photo, the look that comes with the water and the inks mixed together. I am also using glossy paper here. This also works with uncoated or matte papers and I will show some of that later.
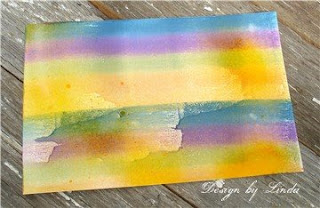
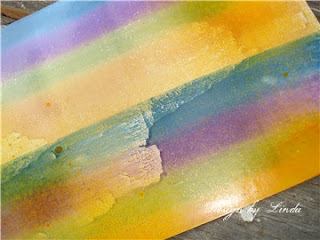
 #4. Here is a piece of paper with the brayer run across the paper with two widths of the brayer, so it is run across twice. I only ran the brayer across once too but you can continue to re-ink it and run it across over and over until you have the color you want. I wanted to make sure that my inks showed well as they ran with the misting of the water.
 The photo above shows a good close-up of that paper and the effect.
When you have your paper colored, there are a number of things that can be created with the finished and dry multi-colored paper.
 For the card above, I just stamped a stamp over my colors using black ink. This stamp has all of these images in one piece.
 I added some Glitter Fabric Dimensional paint to the flower portion only, I think you can see a little bit of the sparkle in this photo and another interesting thing is that the paint "raised" the paper in that area so it has an embossed look to just the flower.
 One of my favorite things it to just stamp a background design over the colors. This leaf swirl stamp was a great choice with these fall colors.
 I also used some of my colored paper to stamp my greeting and notice that I stamped the greeting with the line of colors going in the opposite direction of the colors on the background.
Thanks for visiting, Linda (lbpost)
SING TO THE LORD… card
Materials list:
Glossy cardstock
Cardstock
Creole Spice Kaleidocolor stamp pad – Tsukineko, Inc.
Leaf background stamp – Inkadinkado
Verse stamp – Printworks
Black stamp pad - Versafine
FIRST GRADE card
Glossy cardstock
Cardstock
Creole Spice Kaleidocolor stamp pad – Tsukineko, Inc.
Leaf background stamp – Inkadinkado
Verse stamp – Printworks
Black stamp pad - Versafine
FIRST GRADE card
Materials list:
Glossy cardstock
Cardstock
Patterned paper – BoBunny Press
Bouquet Kaleidocolor stamp pad – Tsukineko, Inc.
First Grade stamp – PaperBag Studios
Black stamp pad – Versafine
Glitter Fabric Dimensional paint – Tulip
Machine sewing
Scallop scissors
Glossy cardstock
Cardstock
Patterned paper – BoBunny Press
Bouquet Kaleidocolor stamp pad – Tsukineko, Inc.
First Grade stamp – PaperBag Studios
Black stamp pad – Versafine
Glitter Fabric Dimensional paint – Tulip
Machine sewing
Scallop scissors

I have a brayer collection dust, thanks for the inspiration! Love those multicolored ink pads.
ReplyDeleteFantastic!!!!!! Love how you worked with the backgrounds.
ReplyDeleteAdding a brayer to my shopping list!! These are stunning!!!
ReplyDeleteooooh- this makes me want to get out my Kaleidocolor stamp pad and play with my brayer (which never gets used). Great projects!
ReplyDeleteI love that technique... it was one of the first things I learned when making backgrounds but isn't it funny how you move on and forget about things you learned ages ago. Thanks for re-introducing me to this technique Linda... think my brayer may just get some use for the first time in a long while.
ReplyDeleteTotally love the cards you made..thanks for sharing
hugs
Chris xx
What a beautiful background Linda! I love the colors and I really like how you stamped over the paper you created.
ReplyDeleteThat is really neat Linda!! Love it!
ReplyDelete~Lea
thanx for the background tips...I dont have a brayer but I lnow someone that does lol
ReplyDeletethe background works sooo well with that stamp.
chriss x
Thanks for your commetn on my blog, love the brayering, will have to add one to my wish list!
ReplyDeleteWhat a great tutorial and your cards are gorgeous!!!
ReplyDeleteI love the different ways you used the brayerd CS. What a great tutorial in a way of showing that. I expecially love the last card. The design and detail is just wonderful.
ReplyDelete