Showing posts with label Fall. Show all posts

Sunday, October 19, 2014

A new AAA Cards Challenge

 Fall is here and Halloween is upon us.  That makes this a pretty good challenge at AAA Cards for this week, to use the above image as an inspiration piece.  Plus you are playing for a guest spot at AAA Cards.
 My card is super simple.  Some punched out squares of a patterned paper and a pretty cute little spider cut with the Cricut Expression.
To give it the last little bit of interest, I did a line of machine sewing to look like the spiders web.
This also fits the Less Is More Little Creatures challenge.
Thanks for visiting and be sure to give the AAA Cards challenge a try, Linda (lbpost)

Sunday, November 17, 2013

Brown Leaves

The card I wanted to share with you, mixes a fall theme with the CAS(e) this Sketch.
 Again, I so love this background stamp from Hero Arts.  I combined it with a notebook looking stamp. 
 That great leaf is also a stamp from Hero Arts.  I like the clean look of the brown and white.
Here is the CAS(e) this Sketch.  My take is a little bit loose but love the sketch anyway.
Thanks for visiting, Linda (lbpost)

Wednesday, October 2, 2013

Halloween is on it's way

I am not a big fan of all things Halloween, but I love the pumpkin patch visits and the colors, etc. 
 I loved these little images in the Simply Charmed Cricut cartridge and so I decided to create a little fall decoration with them.  I used a simple 5"x7" canvas for the foundation of my project.
I tore pieces of an old dictionary page and added them to the front of the canvas with Mod Podge.  This was painted with a wash of white paint.  I then added some color and accent by rubbing a brown stamp pad over the edges.  The tree, the bat, the moon and the sentiment were just cut out like they are shown in the cartridge.
Thanks for visiting, Linda (lbpost)

Tuesday, October 1, 2013

World Card Making Day part 1

Since I love making cards, it just warms my heart that there is a day to celebrate Card Making!!!
 Paper Crafts Magazine will have the actual celebration this Saturday, October 5th,  but they are talking about it all week so I thought I should for sure share a card today.  Check out the Moxie Fab blog to read more.
 My card also features the look of Fall.  The leaves and the word "Thanks" are cut with my Cricut machine.  I love the colors of fall.
Thanks for visiting, Linda (lbpost)

Friday, November 20, 2009

It is the time of falling leaves

I found this little bag of the neatest fall colored leaves at a craft store and so I pulled them out this week. My card is based on the bonus sketch at 2 Sketches 4 You.
So, what could be better then a fall themed card?
I punched a circle from the dot patterned paper and formed a wreath with those leaves. I just glued them in place.
And, can you guess what my most recent craft purchase is? This amazing border punch by Martha Stewart! WOW. I punched it with some Jenni Bowlin Core'dinations cardstock. You can see the text embossed design in it when I sanded it.
******
And, I want to share a few more photos from our recent trip. These were taken along the Columbia River in Oregon.
We were driving just outside of Hermiston as the sun was getting low. All of a sudden I could see the amazing beauty in the side mirror.
Have you seen wind turbins before? As we drove along the Columbia River, we came to an area where these giants were lining the hills. I loved the late day sun shining on them.
This photo is just off to the side of the car, the sky full of amazing clouds and again, the sun getting low.
Thanks for visiting, Linda (lbpost)

FALLING LEAVES card
Core'dinations Jenni Bowlin cardstock
Core'dinations Core Essentials cardstock
October Afternoon patterned paper
Leaves from a craft store
Martha Stewart border punch
Twine
Rub-on words - Making Memories
Sandpaper

Monday, October 26, 2009

Think Orange

One thing about seasons and the seasonal changes are the colors we associate with those seasons and changes. ORANGE surely comes to mind in the fall, especially around Halloween. I wanted to show off a few older projects that fit with this last week of October, just before Halloween.
This is a simple, simple card. I picked up a package of spider stickers and this card came about with a minimal of supplies.
This layout and the next one actually use some of the same photos but once in awhile I find favorite photos that I just seem to need to use more then one way. This layout uses a white background paper which is something I don't use often, yet it is fun what a simple background allows you to add in accents. This layout let me also put to use several photos from this day.
A favorite accent idea is to use a Dymo labeler to add a title and/or details. Plus, I really did my journaling a small piece of notebook paper that was torn out of the book and I hand wrote the details. This first layout is 12" x 12".
This one is an 8 1/2" x 11" that was turned on it's side. It is a size and orientation that I don't usually use but I do like the look of it. The title piece was created in the computer and then printed out. The rest of the layout then went together very quickly around that with a striped piece of patterned paper that tied everything together. That adorable date stamp up in the corner is by Hero Arts.
Thanks for visiting, Linda (lbpost)

Tuesday, November 25, 2008

Setting the Thanksgiving Table

Decorated Pumpkin Placecards
There are so many ideas for cute placecards for a decorated table at Thanksgiving. These little decorated pumpkins are easy to create and make for a fun table decoration. I found these are a local craft store. They are small, lightweight, artificial pumpkins that are about 2-3" across.

1. One of my pumpkins was covered with pieces of patterned paper that were glued to the pumpkin with Mod Podge.

2. Two of the pumpkins that I have pictured here were painted with metallic paint, one a copper and one a brown/burgandy.

3. When these were dry, they were all painted with Sparkle Mod Podge by Plaid. If you haven't used this stuff, you need to pick some up on your next trip to the craft store. It is a great way to add some "bling"!

4. The felt leaves are by Queen & Co. I just cut one leaf for each pumpkin. The felt is self-adhesive, so I placed each leaf on a piece of green cardstock and then cut around each one. A long, straight pin was placed between the felt layer and the cardstock layer. The head of the straight pin was cut off first and then each one was bent at the stem of the leaf so that it could be pushed into the pumpkin.

5. The name tags were created and a hole was punched in each one. The straight pin was placed through the hole in the tag before it was pushed into the pumpkin. The material of my little pumpkins was rather soft but I did poke a preliminary hole with my paper piercer first. A dab of glue was put on the end of the straight pin that was going into the pumpkin.


Thanks for visiting, Linda (lbpost)

Monday, November 24, 2008

Thinking about Thanks!

Some of my favorite themes to create with are "THANKS" and "FALL". I love the colors of fall and there are so many reasons to tell someone thank you, not just at Thanksgiving.

This saying would work for really anytime of year, but it works especially well for Thanksgiving time.
I love the extreme contrast between the gold/oranges and the strong black of the image and the words.
This card represents a very simple design and a great little way to thank a friend for any reason.
These circles are part of a piece of patterned paper and a circle punch helped make them a fun accent to my card.
Thanks for visiting, Linda (lbpost)
COUNT YOUR BLESSINGS card
Materials:Solid Card stock
Birthday Boy Circles/Brun Papier/Tres Bien/My Mind’s Eye
Corner rounder punch – PaperShaper/EK Success
Rub-on Design – Walter Knabe/Me & My Big Ideas
Rub-on phrase – Fall Holidays/Scenic Route and Making Memories
Fluid Chalk stamp pads – Colorbox/Clearsnap
Ribbon
Brad – Unknown

Monday, November 17, 2008

A FALL themed card and a gift idea

I love the die cuts that BasicGrey created to go with this collection of papers.
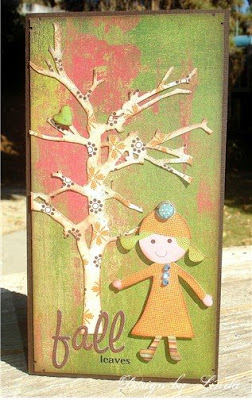
The ones I used here are just perfect for a little card.
Just how cute is this little girl? I added her with foam tape so that my elements had dimension and the little ball on her hat is an additional layer.

There are so many simple and fast ideas for giving a little gift to a co-worker or a neighbor. Just little things that say I am thinking of you and yet, you can make several of these. Mine also shows off some recycling. I used a plastic juice container. Of course, it was washed out well, the label was removed and I filled it with peppermint Lifesavers that are individually wrapped. This way the gift can be filled without having to handle candy. There are so many Christmas papers and supplies that make this a very easy craft. I used "punched out" snowflakes as my accents here.
Thanks for visiting, Linda (lbpost)
FALL LEAVES card
Materials: Solid Cardstock
Patterned paper – Holly/Blitzen/BasicGrey
Punch out images – BasicGrey
Sticker letters – Mellow/BasicGrey
Fluid chalk stamp pads – Clearsnap
Rhinestones – Mark Richards, Inc.
Rub-on word – Making Memories
Clear Paper Glaze – Aleene’s®/Tulip
CHRISTMAS CANDY GIFT JAR
Materials:Patterned papers – Multi-stripe/Serenity Collection/Paper Salon (2 sided)
Circle and Snowflake Punches – Papershapers/EK Success
Tulle – Michaels

Thursday, October 30, 2008

Pumpkin Kind of Day

One last card to go with the theme of the day.
The paper from a paper pad by Crafty Secrets and is just so fitting.
The large orange brad is by Queen & Co and I added this cute spider brad into it. I just poked a hole with my Crop O Dile and added the brad into that hole.
The little pumpkin head doll piece is a Cotton Scraps accent by Crafty Secrets. It is fun to fray the edges of these and then I did some machine sewing around the edges.

Thanks for visiting, Linda (lbpost)
BOO – LITTLE GIRL card
Materials:Solid card stock
Patterned paper – Earthy book/Crafty Secrets/Heartwarming Vintage Collection
Cotton Scraps Halloween image – Crafty Secrets/Heartwarming Vintage Collection
Big brad and spider brad – Queen & Co.
Zig Zag scissors – Family Treasures
Letters for BOO – Thickers/American Crafts
Black Stickles - Ranger
Machine sewing

Wednesday, October 29, 2008

Candy Corn and Spiders

I'm sure that October 31st has to be the most popular day of the year for "Candy buying" and "Candy eating"!!! Every kid looks forward to that. The following are a couple cards that feature Candy Corn, a symbol of Fall and Halloween!
For the above card, I used a card sketch on the Fiskars web site. You already know I love to work with sketches. I also LOVE this collection of papers by Heidi Grace.
The sticker letters for "boo" are covered with a clear glaze to help them stand out and I accented the punched out designs with some glitter.
This next card is an example of about the fastest kind of card to create. It is made up of some rectangles of a variety of patterned papers and a little stamped design. The edges of the patterned papers were sanded and after they were added to the front of the card, a couple lines of zig zag sewing were added for interest and dimension.
Here is a close up of my little spider web. The web and the spider are stamps, stamped with black ink and a little bit of glitter is added to both.
Thanks for visiting and may this weekend be FULL of candy for you! Linda (lbpost)
BOO – TRICK OR TREAT card
Materials list:
Cardstock
Patterned paper and sticker letters – Heidi Grace
Squeeze punch- Bling Bling/Fiskars
Pinking decorative scissors – Fiskars
Circle template
Glitter
Clear Paper Glaze – Aleene’s®/Tulip
Machine sewing
SPIDER WEB card
Materials list:
Cardstock
Patterned paper - Paper Salon
Stamps - Paper Salon
Machine Sewing
Sandpaper
Black ink