Showing posts with label My Stamp Box. Show all posts

Monday, September 20, 2010

A Stamp here and a Stamp there

Todays post is about some really fun stamps. Fun in design and fun to use.
The first card I want to share is this cutie created with My Stamp Box stamps.  Core'dinations cardstock and My Stamp Box did an exchange and this is one of the cards I put together with these stamps. I LOVE this set of stamps, how does it get better then patterned clouds! Be sure to check out both of those blogs, Core'dinations and My Stamp Box, for more ideas, both teams created cute stuff and there are prizes to be had by leaving comments on both blogs.
For this card I did an exercise with masking. 
If you don't know what masking is, it is a technique that allows you to stamp more then one image and have one look like it is "behind" the other or one "on top" of the other, whichever way you look at it. 
1.  I stamped the sun first. 
2.  Then I stamped the sun on a piece of copier paper (you need a thin paper for a mask).  I cut that extra sun out.  Now that cut out sun is placed over my original sun and one of the clouds was stamped, inking it with black ink.  Where the sun mask is, the cloud image will not stamp and when the sun mask is then removed, you will see the sun looking like it is "on top" of that cloud. 
3.  I then made a mask of the first cloud, I placed the sun mask and the cloud mask over the images I had stamped and I stamped the second cloud.  Now my sun and the first cloud look like they are "on top" of the second cloud. 
4.  I kept those two masks in place and sprayed my white cardstock with some Glimmer Mist spray, first a blue Chalkboard spray and then a blue Glimmer Mist spray to create my "sky" behind the sun and clouds.  This kept the spray off of the sun and clouds. 

The sun is accented with a little bit of Glitter 3-D Fashion Paint for just the right amount of glitter.
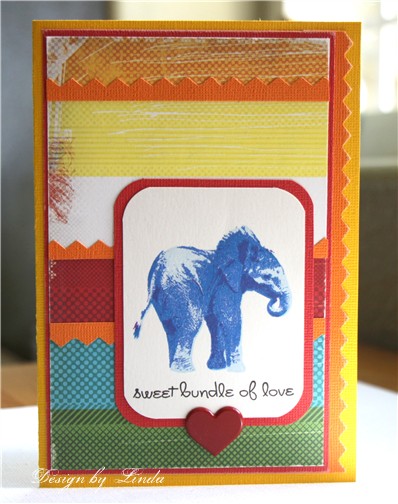
Next I want to share my Card Positioning Systems card for this week.  The sponsor is Kitchen Sink Stamps.  If you are not familiar with that company, it is known for it's 3 or 4 step stamping process.  I just don't even know how she does it, but by stamping the layers, you keep adding details that are pretty hard to believe are stamps. 
This is one of her brand new stamp sets.  This little elephant is just too adorable.  I chose to stamp it in shades of blue so that it would fit for a baby card.  The set comes with a number of adorable little sentiments to go with it.  I just love the font she uses. 
One thing about using these stamps is determining what colors to use for the layers.  It works best to start with a very light shade and then each additional layer should be darker and darker.  For my last layer on this little guy, I used a purple that really helped define the cute details.  I listed the exact shades I used in my materials list.
Thanks for visiting, Linda (lbpost)

RAINY DAY? card

Materials list:
Cardstock – Vintage and Core Essentials/Core’dinations
Curious Iridescent Cryogen White/CutCardStock.com
Clouds, sun and sentiments stamps – My Stamp Box
Black Versafine stamp pad
Clear embossing powder
Tattered Angels – Glimmer Mist and Chalkboard
Sandpaper
Self adhesive rhinestones – Queen & Co.
Copic markers
Glitter 3-D Fashion Paint – Tulip


SKETCH 185 – SWEET BUNDLE OF LOVE card

Materials:
Cardstock – Core Expressions/Core’dinations
Elephant and sentiment stamps – Courtesy of Kitchen Sink Stamps
Patterned paper – Cosmo Cricket
Versafine black stamp pad
Memento stamp pads - 1. Summer Sky, 2. Bahama Blue 3. Danube Blue 4. Grape Jelly
Heart brad - Recollections
Corner punch – Martha Stewart
Sandpaper

Saturday, July 31, 2010

Butterflies and a Pierrot Doll

Yeah, another Saturday and another Unscripted sketch. I love getting to share mine with you. Here is the sketch (make sure you play along this week) and make sure you also check out what the rest of the team did with the same sketch.

When I looked at this weeks sketch, I wanted to think "outside the box" a bit on how to create my card. So, instead of using ribbon or string to "tie" the two accent pieces together, I created little rows of punched out circles and ran a line of machine sewing through each of them.
 Notice that cool embossed design? That is my brand new texture plate from PaperTrey, Inc. And the butterflies are my brand new stamps from My Stamp Box. I stamped them with white ink and embossed them with white embossing powder on white cardstock. Next I sprayed them with some Glimmer Mist by Tattered Angels. That bit of colors created some a soft look.
And, I just couldn't wait to share this cutie with you. This is a Pierrot Doll and it is from a brand new stamp set by Pink Persimmon and it isn't even released yet, so this is little sneak peek. The set is called Holiday Favors and it contains several cute images.
I would have called this little guy a clown but I guess if you want to get technical then it is a Pierrot Doll. Any which way it is so cute. All of the dots on his little costume are colored with a Copic marker and then accented with Aleene's Paper Glaze. It is also added to the shoes, cheeks and pompom on the hat. The Paper Glaze adds a fun, extra shine and dimension to the image. The background is super simple, it is just little square stamp pads tapped directly onto the cardstock. LOVE the color combo.
The banners are from a set by Pink Persimmon. The banners are sets of words so stamping them and using them is so easy. Happy is all one stamp, Birthday is another stamp. I did cut each one out after stamping it and that really just takes a minute.
And this little ruffle edge is in the same set. I just stamped it repeatedly to go across my card. The card design fits with the Clear and Simple blog anniversary sketch.
Thanks for visiting, Linda (lbpost)

SKETCH 66 – JUST HI card
Materials:
Cardstock – Core Impressions/Core’dinations
Patterned paper – Olivia/BasicGrey
Butterfly stamps – My Stamp Box
Rub-on sentiment – BasicGrey
White stamp pad –Joann’s
White embossing powder – Stampendous
Glimmer Mist – Tattered Angels
Circle punch – Papershapers
Corner rounder punch – Fiskars
Machine Sewing
Texture plate – PaperTrey, Inc.
Sandpaper


PARTY CLOWN card
Materials list:
Cardstock – Core Expressions/Core’dinations
Patterned paper – Boy Gingham/Snuggle Bug/Little Yellow Bicycle
Versafine colored stamp pads

Black Versafine stamp pad
Clear embossing powder – Stampendous
Stamps – Holiday Favors/Pink Persimmon
Copic markers
Clear Paper Glaze – Aleene’s®
Self adhesive Rhinestones –Queen & Co.
Corner rounder punch – Fiskars
Black sticker letters – Making Memories
Foam tape – 3M
Sandpaper

Thursday, July 22, 2010

Designer Clouds!

I am a sucker for just about anything that has a houndstooth pattern to it and so this cute set of stamps by My Stamp Box is right up my alley and I had to put it to use.


Kazan's 2 Sketches 4 You sketch #57 was just the design idea that I needed. The cardstock for the card base is a newer Core Impressions piece from Core'dinations cardstock. It comes with that embossed design on it already, all it needed was a little bit of sanding. The patterned papers are by Little Yellow Bicycle.
Are these just the cutest little sun and clouds images you have ever seen? There are other designed clouds in the set too. I stamped the clouds with a Versafine black stamp pad and then embossed them with clear embossing powder. The sun is colored with Copic markers and the little bit of glitter that you see if Glitter 3-D Fashion Paint by Tulip. I love this glitter because it is so easy to use, easy to find and it adds glitter and it still lets you see the color underneath. The white, embossed scallop is a sticker by Martha Stewart.
***
One CUTE photo to share
This wonderful and smiley expression is from last Saturday when we were playing with water in the backyard. This little guy can play with water forever!
Thanks for visiting, Linda (lbpost)

CLOUDY DAY - CHEERS card
Materials list:
Cardstock – Core Impressions/Core’dinations
Patterned paper – My Little Yellow Bicycle

Black Versafine stamp pad
Clear embossing powder – Stampendous
Stamps – Wishing You Sunshine/My Stamp Box
Alphabet stickers – October Afternoon
Foam tape – 3M
Sandpaper